RPS Command Library v4.0 Releases Monday 26th April 2021
For additional updates pushed through RPS Command Library v4.1, please check HERE
We are pleased to announce the release of the latest updates to the RPS Command Library.
Using the Installation exe.
The installation .exe will clean up your TML library installation and install all of the TML commands in one process. You must close all instances of TBC prior to running the installation program. The process will take a few seconds to complete. You can then restart TBC.
Download the installation exe file - [Click Here](https://rockpilesolutions.com/files/RockpileSolutionsCommands.exe)*
Once you have restarted TBC, go to the Tool Shed Menu and run the Menu Manager command.
Click the Reset RPS Menus button to finalize the installation and then close the Menu Manager command.
If for any reason during start up you see any Traceback or similar errors pop up, please call us so we can take of those promptly. We have been testing the installer on a number of computers of our user base to trap all of the issues that may be encountered and we hope that the update will go smoothly.
We recommend that you do not use TMLStatus for a couple of days after this update while we finalize all updates on the central system used by TMLStatus. TMLStatus will be back on line for future updates within 48 hours of this release.
Most of the TMLs will be updated to v4.0 as a result of this release. There are a few that we are still adding some additional functionality to that may be at 3.9x which will be updated over the next week or so - the 3.9x versions installed by the installer are all tested and are all ready for use today.
What Is New in v4.0
This release has new commands, updated commands, the New Layer Control is embedded in all commands that have a Layer selector and the new RPS Settings has been implemented in many of the existing and new commands - more commands will follow. We have also addressed a few defects that have been reported in the last few weeks.
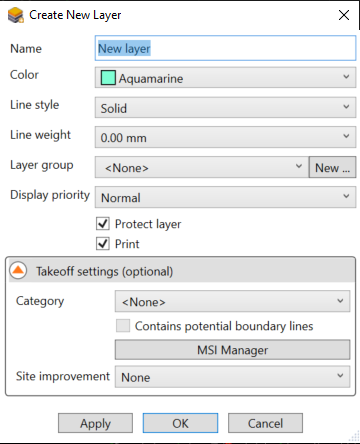
New Layer Control and Command
The New Layer control and Command can now be found in every RPS command that has a Select Layer Control. The control provides an easy and fast way to create a New Layer and or a New Layer Group, and setup all of the Layer properties as well as how the Layer will be used in Takeoff. The control has also been created as a stand alone command - we recommend shortcutting to it using the Define Command Shortcuts command (Support Menu) and setting CTRL N to New Layer.
RPS Settings Control and Command
You will now find that many commands have access to the RPS Settings function. We are now creating centralized settings files for many commands that store your preferred settings for instant recall when you run the command. We have also introduced the concept of Styles for many things like Point Creator to define how the commands work / create data which are managed through RPS Settings. RPS Settings is independent of a single Project and also independent of TBC version updates - allowing you to retain your settings as the product moves forward. RPS Settings also simplifies the operational command dialogs through hiding settings that you do not need to change on each running of the command. RPS Settings can be stored on a local drive or a network location that can be used by a group of users. Note that a group use case currently allows all users to change the settings, so we suggest that each group member create a local copy from the centralized location so that they have their own local instance of the settings.

All New Commands
The following commands are new to v4 of the command library.
RPSTakeoff Lines Command
One area we have been focused on is digitizing linework from PDF plans. There are many commands in TBC that can do this, however we wanted to make this simple, fast and easy in one command and provide you with all the tools you need in one place. The new Takeoff Lines command is a great example of what we are trying to achieve at Rockpile Solutions - it will save you hours and make your work more enjoyable.
Click Here to watch a short video of the command in action
For full details on the command Click Here to visit the command help page.
The command provides dedicated methods to create lines with straight and arc elements, with additional VPI locations (no horizontal location just height control) and a range of options to control both height and horizontal input to increase speed of operation
2D Lines - create 2D lines with no elevation input whatsoever
3D Lines - Constant Height - Enter a height on the first point and not again till you start a new line
3D Lines - Variable Height - Enter heights on each node. Pause and request input or display selected location elevation for adjustment or acceptance on each node
3D Lines - Auto - Variable Height - 3D locations are auto accepted, 2D locations - heigts are requested - total flexibility and maximum speed.
3D Lines - Elevation from Surface - this allows you to create lines that are either draped on the surface or at an offset to the surface automatically - ideal for tracing pavement areas or for creating eg utility lines at a depth below finished grade

In addition you have the ability to specify a fixed number of points for each line - eg 2 point lines for utility lines or 4 point lines for pads with the option to autoclose the line to create a polygon area.
In addition you have the ability to enter a formula to compute the Z value from the inputs and adjust using the formula - e.g. to enter values from the plans but then subtract a fixed amount to adjust eg Top Back of Curb down to Flow Line or to enter 28.53 for 5428.53 and have the software add the 5400 or to enter 2853 and have the software add 5400 and then divide by 100 to create 5428.53 etc. This great to adjust to subgrade from finished grade, or to just use the data provided in a different way than expected.
In addition we can reverse the line in one click so you can edit in either direction from either end and we can enable Rock Grips to adjust a line that you may have digitized incorrectly.
What’s more? We also incorporated all of your most likely commands into the header bar, and configured our command to interface
Optimize Linestrings Command
We have been working on a work process to support stringless pavers (Main Line pavers and Curb and Gutter machines). These machines will often run off 3D alignments. The Curb and Gutter machines cannot pave around right angle corners. The pavers need lead in and lead out lines that do not cross over themselves. The lines need to be curvilinear in the horizontal geometry and have smooth curvilinear in the vertical geometry. The output for some makes of machine control systems require 3D alignment strings in XML format. The following commands were written to satisfy this work process and will take huge amounts of time out of the data prep process, and allow you to do everything inside TBC. Commands like Optimize Linestrings and Explode Lines can also be used for many other applications.
Click Here to visit the Help Page for the command and see the command in action
Optimize Linestrings takes 3D linestrings and turn them into 3D curvilinear linestrings in both horizontal and vertical geometries. The command takes chorded horizontal lines from Survey, PDF Extraction, CAD files and computes straight / arc elements using user defined tolerances. The same lines are also analyzed vertically to create straight and vertical curve elements to smooth out the vertical profile, accounting for horizontal geometry constraints such as angular corners for parking bays etc.


Yes - it is that good!
Explode Lines Command
Not a new command but a new use for the command in this workflow. The linestrings need to be exploded to break them at angular corners. The Explode Lines command takes care of this for you on any number of lines in a single step.
Extend Lines Command
The command selects all the lines to be exported and adds a line extension of a defined length to the start and end of all lines at the correct bearing and slope to satisfy the lead in and lead out of the paver.
Pre Process Line

Post Process Line

Export XML Command
The command selects all of the lines to export and converts them internally into alignments and exports them in the LandXML format required for stringless pavers for curb and gutter and main line pavers.
The Robots are Coming!
We have also been working with an Israeli company called CIVRobotics. They make a staking robot for construction applications that uses GPS positioning to navigate and stake points automatically. We see this as a game changing technology that we wanted to be a part of. The robot reads a points file, and has automated GPS control to navigate between points accurately. At each point it precisely positions itself and sprays a spot of paint at the stake location. To this end we have created 2 new commands that support a bi directional workflow between TBC and the robots.

Point Creator Command
Click Here to read the full documentation for the command and to see the command in action.
This has universal use and is not tied to the CIV workflow at all. Take any site data (CAD Lines / 3D Linestrings or any highways / corridor data (Alignment and lines) and the point creator will create you all of the point stakeout information required based on defined styles set up in RPS Settings. Create Radius Points, Intersection IP points, Tangent Points (PC/PT), points at Intervals or at subdivide locations on arcs. Create points at Station equation locations, and all of your vertical control points. Select all or a subset using different styles. All points created are 3D and are named according to user definable rules. Your staking crews will be really happy with the points we can now create in just a few seconds.


CIV Robotics Manager Command
Click Here to read the full help documentation for the command and to see the command in action
This command allows you to select points or use a variant of point creator to not just generate the points but also sort them and organize them into a smart path that optimizes the route for the robot. The robot can cruise up and down lines or across a section. You can select lines in an order and generate points along the path that you want the robot to take. Once created the points can be exported to the device in the required format via our inbuilt email server that directly connects with Outlook and sends the file by email. On the back end, the As Staked locations are captured by the device and returned to the office and imported as As Staked records for reporting and QA purposes.

Improved Commands
There have been many commands that have seen improvements in this release. Improvements include
Adding line direction to a number of commands
Adding the New Layer control to all commands
Adding RPS Settings to a number of commands to simplify the user interface and centrally store your settings for use in other projects or by others in your team.
In addition the following notable additions have been made
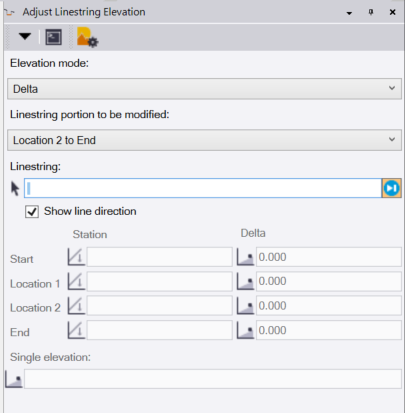
Adjust Linestring Elevation Command
The user interface has been redefined to make it easier to use and we have added the ability to apply a delta elevation over a distance to taper a linestring vertically to match existing or desired grade. The adjustment takes into account the existing grades and curves and adjusts the linestring accordingly.

New interface dialog - designed for ease of use
Increment Text Command
This command has received a big improvement in usability that increases speed and flexibility. You can now edit any label you create with a single click and a pop up editor right next to your cursor - a sign of things to come from RPS … - next label is back on track after any edits have been made

Find Surface Area Command
The surface area text labels are now automatically placed at the area centroid and we have improved the create text dialog to allow the entry of user defined text in the text label prior to placement.


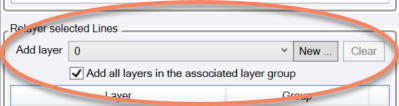
Geometric Selection Command
We added the ability to easily clear the target layer list and also to populate the list with all layers from a selected layers layer group to make it faster and easier to populate the lists.
Define Extra Stations Command
We improved the line direction control as well as added defined stations markers that highlight when selected in the list of defined stations

Lock Views Command
We continue to enhance the Lock Views command - we now allow you to lock two plan views together with different view filters applied so that they pan together with the same or different view scales. We highlight the tighter view area in the second view so that you can keep track of where the views are in relation to each other.

Convert to Linestrings Command
A while back we added the ability to filter horizontal line nodes out of the selected linestrings, we can now also filter out elevation vertices along the same lines at the same time. Typically data coming out of AutoCAD in DWG format is chorded and have a lot of 3D vertices, you can now filter those down using this improved tool.

Renamed Commands
Explode Surface becomes Extract Surface Features Command
We have renamed the RPS Explode Surface Command to Extract Surface Features to better reflect what it does and to separate it from the simpler Explode Surface command that we manage for Trimble. The command remains in the same place on the Modeling Toolbox menu ribbon.
Defects Addressed
Cut Sheet Report
We addressed an offset ordering defect raised recently by a user where the first element of a template was defined at an offset to the centerline and was pointed towards the centerline. We changed the way we order the data now so it is more robust in the way the report is computed and generated.
Offset Slope and Slope Slope Commands
We addressed a couple of minor defects that were identified when you selected the end station at the end of an alignment.
Point Detail Report
We added RPS Settings controls as well as line direction controls to this valuable point reporting and data generation tool.
Quick Line Command:
We addressed the need to remember the last used layer name on a second or subsequent running of the command. This command remains one of the free commands from RPS but has been fully eclipsed and replaced by the new Takeoff Lines command for all your line drawing or digitizing needs.
Compute Lot Setback Command:
We addressed some issues that were reported where the command would not work correctly.
We hope that you love the new and improved tools as much as we do, and that now you will have more hours available each week to tackle more projects and win more bids! Your mouse should now last longer (fewer clicks per day) and you will be more competitive as a result of partnering with us!
Please provide us with feedback - we love to hear what you think and if we missed anything I am sure you will let us know
Happy v4.0!
Are you Ready to Rockpile!
Keep It Sharp!