Permit Area Manager
Command Licensing and Default Menu Location
- The Permit Area Manager command is part of the RPS Modeling Toolbox
- The command is located on the Modeling Toolbox menu ribbon
- The command is located in the Drafting menu group
Command Description
Provides a fast and easy way to manage project permit areas that are open or closed at any time. The tool provides the ability to create boundary areas, assign them attributes of Open or Closed as well as define a maximum value for total open area at any one time. A table can then be placed in the plan view that contains all Permit Areas, their Open / Closed state and a warning if total Open area exceeds the target maximum. Permit Areas are shaded based on their open or closed state and labeled with their permit area properties.
Command Training Video
The following video shows how to utilize the Permit Area Manager command
Update Information
Command Interface Description
The Permit Area Manager command dialog looks as follows

Permit Area tables:
The permit area manager command allows you to create any number of permit area tables for your project. For example each phase of a project or section of a project may have their own permit areas. You may create a different permit area table each time you decide to change the Open / Closed state of the project areas. You may have permits for different types of work or for different subcontractors etc.
In this section you can create a new table by clicking the ![]() button. This will prompt you to enter the name for the new permit area table. If you wish to create a new permit area table, pull the permit area table list down and select New Table and then click the
button. This will prompt you to enter the name for the new permit area table. If you wish to create a new permit area table, pull the permit area table list down and select New Table and then click the ![]() button
button
You can rename the currently selected permit area table by clicking the ![]() button. This will open the permit area name edit dialog.
button. This will open the permit area name edit dialog.

To delete a permit area table, select the table name from the pull down list and then click the ![]() button to delete it.
button to delete it.
To add areas or edit areas for the permit area table, make sure that you select the correct permit area table in the pull down list prior to amending the settings or content for the table.
Select areas:
Select the areas from your project drawing that you want to be used in the Permit Area analysis. You can use the [Options] button to select by the normal select modes (Select All, Select Similar, Invert Selection, Select by Elevation Range, Select by Layer, Select by Polygon, Select Points, Advanced Select).
The lines that you select need to be closed areas (Polylines, CAD Lines, Linestrings, Boundaries etc.) that have the “Closed” state set to Yes in the properties of the object. Note that Closed in this context means a closed polygon area not an Open or Closed state for construction operations. All lines that are selected will be converted to linestrings through this process so that they can be filled with color using this command.
The lines that you select will populate the Areas table.
You can add or remove lines from the Areas list table using the usual CTRL or SHIFT and select methodology of TBC i.e. place the focus in the Select areas field. hold the CTRL key down and click on the line(s) that you wish to add or remove from the table.
Use Case Notes
Areas with exclusions e.g. Wetland Areas
If you have areas that have exclusion areas within them that do not contribute to the Open Areas limit, then you can create boundary lines that contain the outside limits and the inner exclusions using the Track Region command. In this command, select the outer area and the inner exclusion areas and then check the Track inner regions checkbox and Merge holes to boundary checkbox and then for the reference point click anywhere in the space that will be the resulting permit area between the outer and inner boundaries.

The composite boundary line looks as follows, note that the outer line is connected to the inner lines with a line that connects from the Outer to the inner and then from the inner to the outer along the same path

Areas That Overlap
Note that you can have areas that overlap in the table, however if two areas that overlap are both open they will both contribute their areas to the Open Area calculation, i.e. the overlapping area is not identified and excluded from double counting.
Ideally set your permit areas up so that they do not overlap, that way all of your areas are unique and can only contribute their area when selected as Open status.
Areas:
The Areas table will fill out as you select lines in the select control. Each line selected will fill in a row of the table, and will display the Name of the line, the Area that it encloses, the State - default state is Closed, and the date and time that it was last modified. You can select the row and then the State cell and you can change the state from Closed to Open or vice versa. When you change the state, the Date and time of the change will be captured from your computers operating system.
When you select a Row or Rows in the table, the polygons will be highlighted in your highlight color defined in RPS Settings. You can access your RPS Settings from the icon in the header bar of the Permit Area command of from the Tool Shed menu.
You can group select consecutive rows in the table and then change the Open / Closed state for the selected group of areas using the Shift and click selection method, continue to hold the Shift key and click in the lowest selected row State cell twice (once to highlight it and once to open the Open / Closed selector), change the value from e.g. Closed to Open and then Tab to exit the cell, this will update the selected row values and update their Modified Date and Time.
To remove an area from the table, highlight the Selected areas control, and then hold the CTRL key and select the area that you wish to remove from the table (this is the standard Select / Deselect methodology of TBC).
As you change the state from Closed to Open, the Total Open Area is shown beneath the table. Normally there is a maximum allowable open area at any given time, you can set the maximum value in the next area of the dialog.
Note that the "Committed open area value shows what is currently committed, if you change an area from Open to Closed or Closed to open, this number will only update when you click Apply or OK to commit the changes. At that point this number and the permit area table will be updated.
Maximum open area allowed:
Enter a numerical value for the maximum allowable open area at any given time. If this value is exceeded you will be warned allowing you to make adjustments to the table to keep within the limit.
Place on layer:
Select the layer on which you want to place the Permit Area Table for the drawing / project. If you need to create a New layer, click the [New …] button and enter the layer name and default layer properties that you require. You can also create a new layer group if required from the New layer dialog.


Label permit areas checkbox:
Check this checkbox if you wish to label the permit areas at their centroids with the Area, State, Date Modified etc. information. Once selected, you can use the Edit label content button to select what items you wish to use in these labels. If you wish to add Leader Lines to the text created you can use the Create Leader Lines command to achieve that and then move the text outside of the area as needed.
Edit label content:

You can select any of the items from the Value codes column of the dialog and insert them into the Label text column. The order of data in the Label text column is the order in which the labels will be drawn. If you wish to insert an item in the middle of the list, create a blank row in the list using the Enter key, enter any prefix text that you require e.g. Time: and then select e.g. the Time Value code and click Insert. To delete data from the list, simply select and delete it and remove unwanted blank rows using the backspace and delete keys.
The data entered in the Label text area of the editor can be edited like a text editor. Use CTRL C, CTRL V, CTRL X, Delete, Backspace etc. to manipulate the data for the text label.
Fill permit areas checkbox:
If you wish to fill the permit areas with color, indicating their Closed or Open state, check this checkbox and then select the colors that you wish to use for the Open area and closed area states using the color selectors. The fills are automatically set to 50% transparency.
Table location:
Select where in the drawing you wish to place the permit area table.
Table options:
The Table options show the values that can be displayed in the table. These are
- Title = Title for the table e.g. Permit Area Status and Maximum open area information
- Column 1 = Header for the column - Area Name
- Column 2 = Header for the column - Open Area ({Units})
- Column 3 = Header for the column - Closed Area ({Units})
- Column 4 = Header for the column - Date Modified
- Column 5 = Header for the column - Modified Time
Check the check boxes in the Include column to add the Title or column to the Permit Area Chart.
To modify the Text for the chart, select the row that you wish to change and then click the Modify selected table text button to open the Label editor. You can also double click in the Text field to open the same editor.

For example, in the Title row, you can change the Text for the title itself e.g. Permit Area Status, and then you can optionally add the Maximum Open Area value and units if required as an additional line in the Title Area of the chart. To add the values to the label text, create the blank line in the Label text column of the editor, and then add prefix text that you need e.g. Max Open Area: and then select the Maximum open area Value code and click insert then add a space and then select the Units value code and click Insert to create the Label for the Title of the chart.
Complete this process for each table column that you require. You can control which data type goes into each column so that you get the layout desired.


Command Tips
Note that the area labels are dynamically linked to the Permit Area Table. They are refreshed each time that you click Apply in the Permit Area Manager command. While you can move the labels manually to center them in an irregular shaped area, they will be returned to the area centroid each time that you click Apply or OK. If you have applied Leader Lines to them the leader lines will be deleted.
Header Commands
In the header bar of the command you will find command icons that link you to other commands that you may need access to while using this command. In this command the following commands are linked
- Help - this document access
- RPS Settings
- Takeoff Lines
- Smart Edit
- Adjust Linestring Elevation
- Create Boundary
- Track Region Outline
- Shrink Wrap
- Text Style Manager
- Leader Lines
Apply
When you tap apply, the permit area table will be created, the permit area labels will be placed and the permit areas will be shaded according to the settings you have defined. The command will remain open and allow you to make further changes that will interactively update the drawing elements until you click OK or Cancel. The committed open areas value will also be updated.
OK
Executes the command and closes on completion
Close
Closes the command without further execution. Any changes that have not been applied will be reverted to their prior state.
The end results of the process will look as follows
The Permit Area Table

Shaded Areas
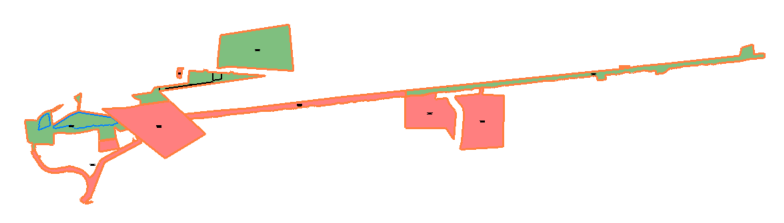
Shaded Area Labels

RPS Settings
The text styles for the Title text, Column headers and Table Content are all set using the Table Settings in the RPS Settings function. You can access RPS Settings by clicking the orange R icon in the header bar of the permit area manager command


Use Case Videos
The following videos show the use of the Permit Area Manager command in a work process context
Feedback and Enhancement Requests
If you would like to provide feedback on the use of the Permit Area Manager command or to request enhancements or improvements to the command please post a Reply below