Overview
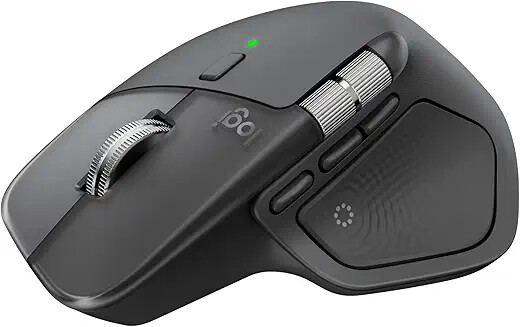
In this document we go over the process to configure the Logitech MX Master 4 Mouse. This Mouse is the best I have ever used, and it is easy to configure to boost your personal productivity when using TBC.
Mouse Configuration Highlights
The Mouse has haptic feedback - this means it vibrates in your hand slightly when certain events take place giving you direct feedback that something happened.
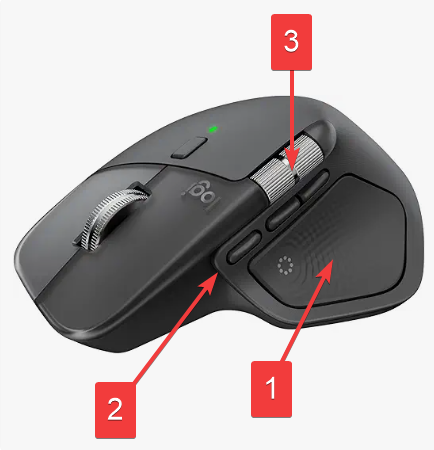
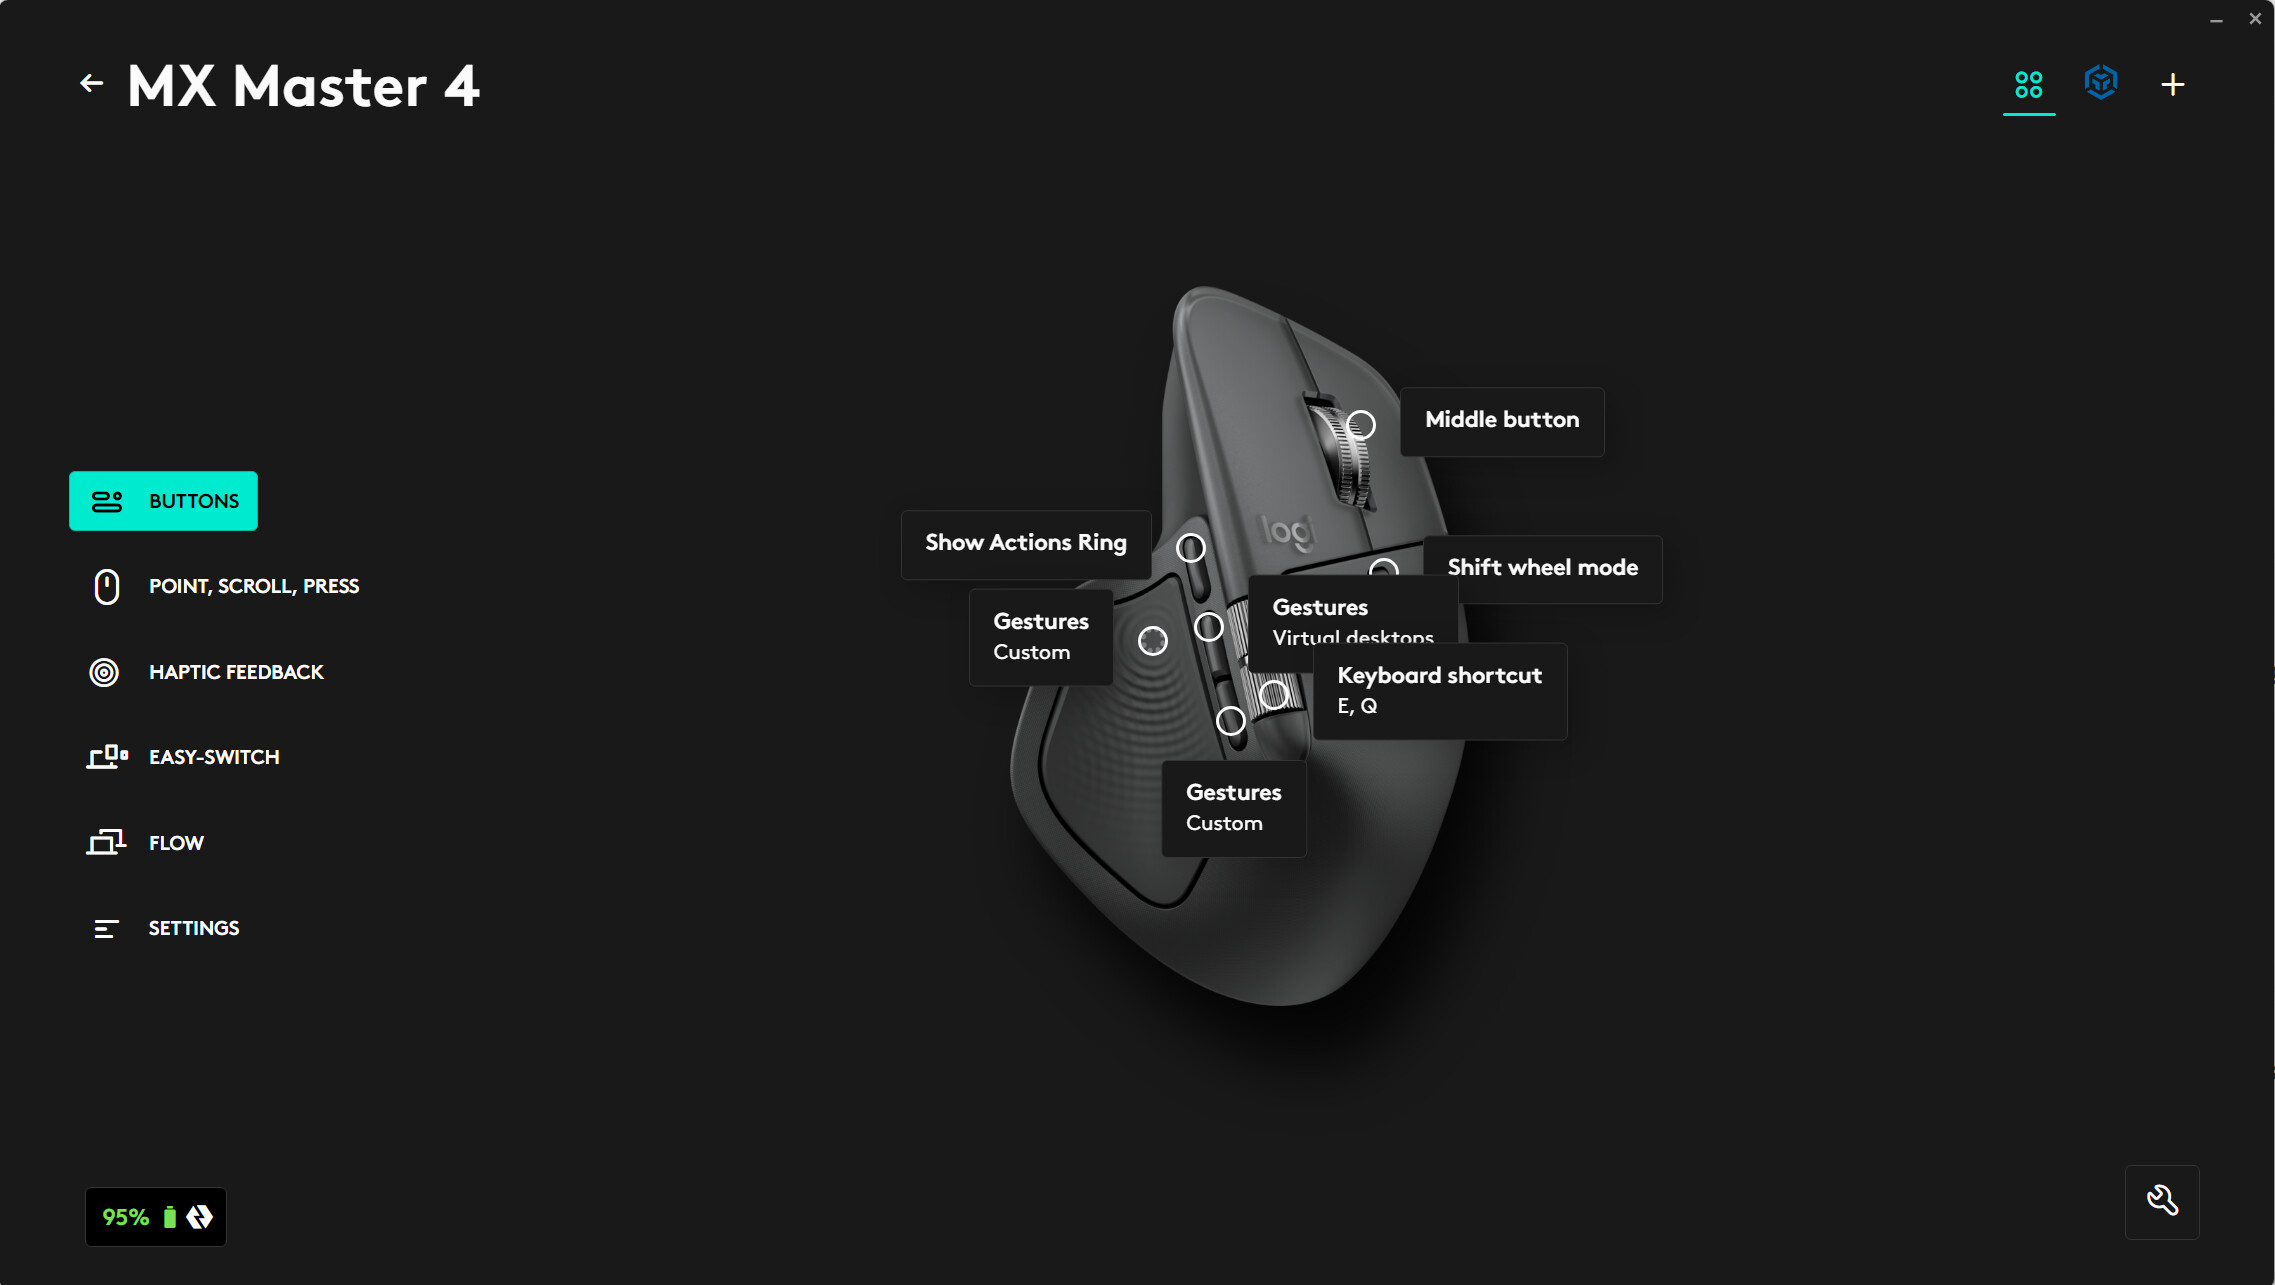
The Mouse also has a squeeze button under your thumb (1) which we program to run the RPS Navigate Radial menu, this means it executes the keyboardshortcut CTRL - SHIFT - D that we use to execute that command.
The squeeze button can also be programmed with 4 additional “Gestures” - the gesture is Squeeze plus a Forward, Backward, Left or Right movement of the mouse. These gestures can also be programmed to execute keyboard shortcuts.
The Mouse also has 3 additional Programmable Buttons (2) just above the thumb pad, making them extremely easy to access. Button 1 at the front we program to use our TBC Action Ring - this contains all of those tools like Snaps, Measure, Inverse, Explore Object etc that you need along the way when you are running other commands. This is a great supplement to the RPS Navigate radial menu, and enables the RPS Navigate to focus on Major Workflows, and the Action Ring to focus on sidebar tools that you need while working.
In addition each button can also be programmd with up to 4 additional gestures as for the thumb squeeze button allowing you quick access to other key functions.
The mouse also has an additional scroll wheel (3) on the thumb area, this we program to Rotate the Plan View Left and right so that you can dynamically scroll the wheel to rotate the screen which is pretty cool (only works while running RPS Smart Suite commands).
Lastly, the Mouse has the usual Left and Right Click buttons, the mouse wheel scroll and a toggle button to control the mode of the mouse wheel.
Software and Configuration Downloads
Download the Logitech Logi Options Plus Software
Click Here to download the Logitech Options + software
Install the software, you cannot configure the mouse without it.
Once installed, run the software and Log In / Setup a User Account. Your profiles for your Logitech devices will be stored in your online Logitech Account. This will allow you to use the same profiles on different computers quick;y and easily.
Download the RPS Actions Ring Configuration
Download this file, you will use this file to configure the Actions ring for TBC use. The file contains custom icons and a command structure that we are maintaining for the MX Master 4 Mouse.
Configuring the Actions Ring Capability for TBC
To configure the Actions Ring Profile for Trimble Business Center, follow these steps
Run The Logitech Options Software
When you open the Logitech Logi Options Software, if you have already paired your Mouse with your computer using Bluetooth, or if you have plugged in the USB C Receiver, the Mouse will appear on the Logi Options+ landing Page. If the Mouse does not show up, click Add Device and follow the instructions to connect the MX Master 4 Mouse to your computer.
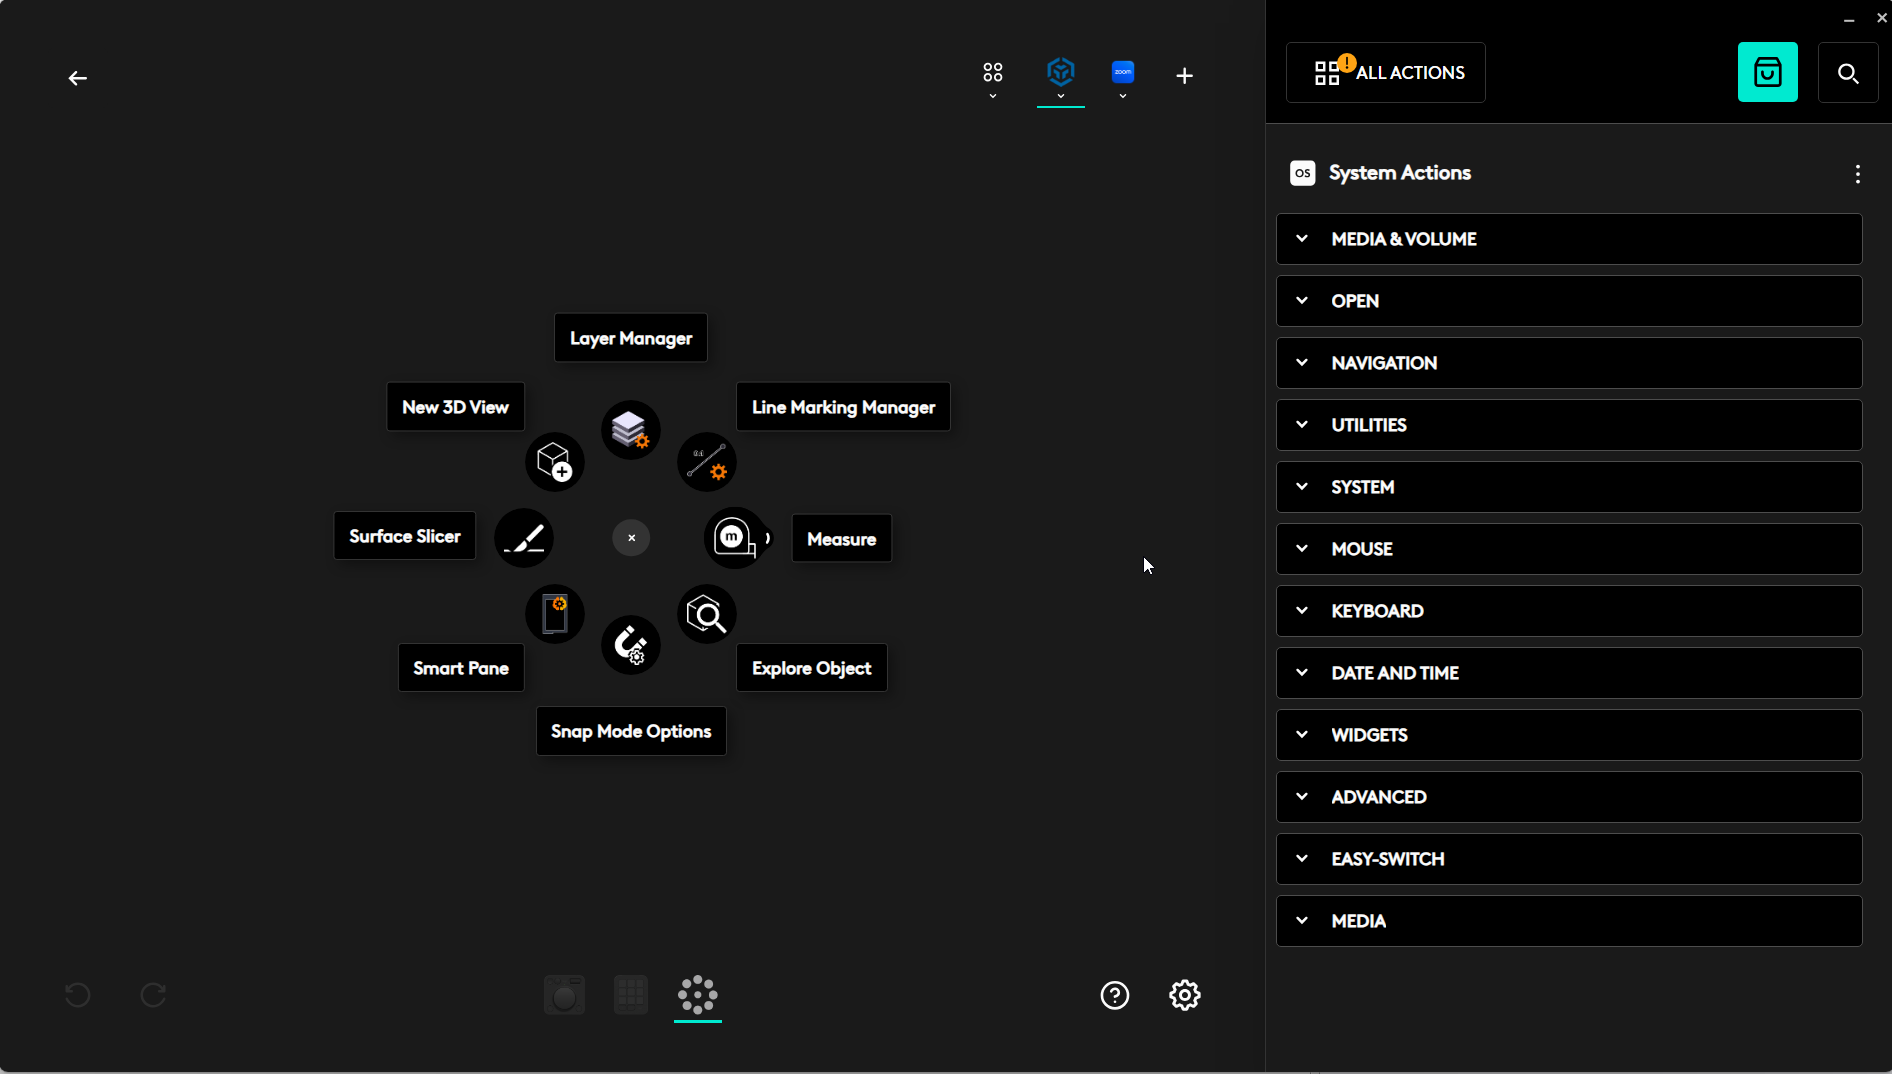
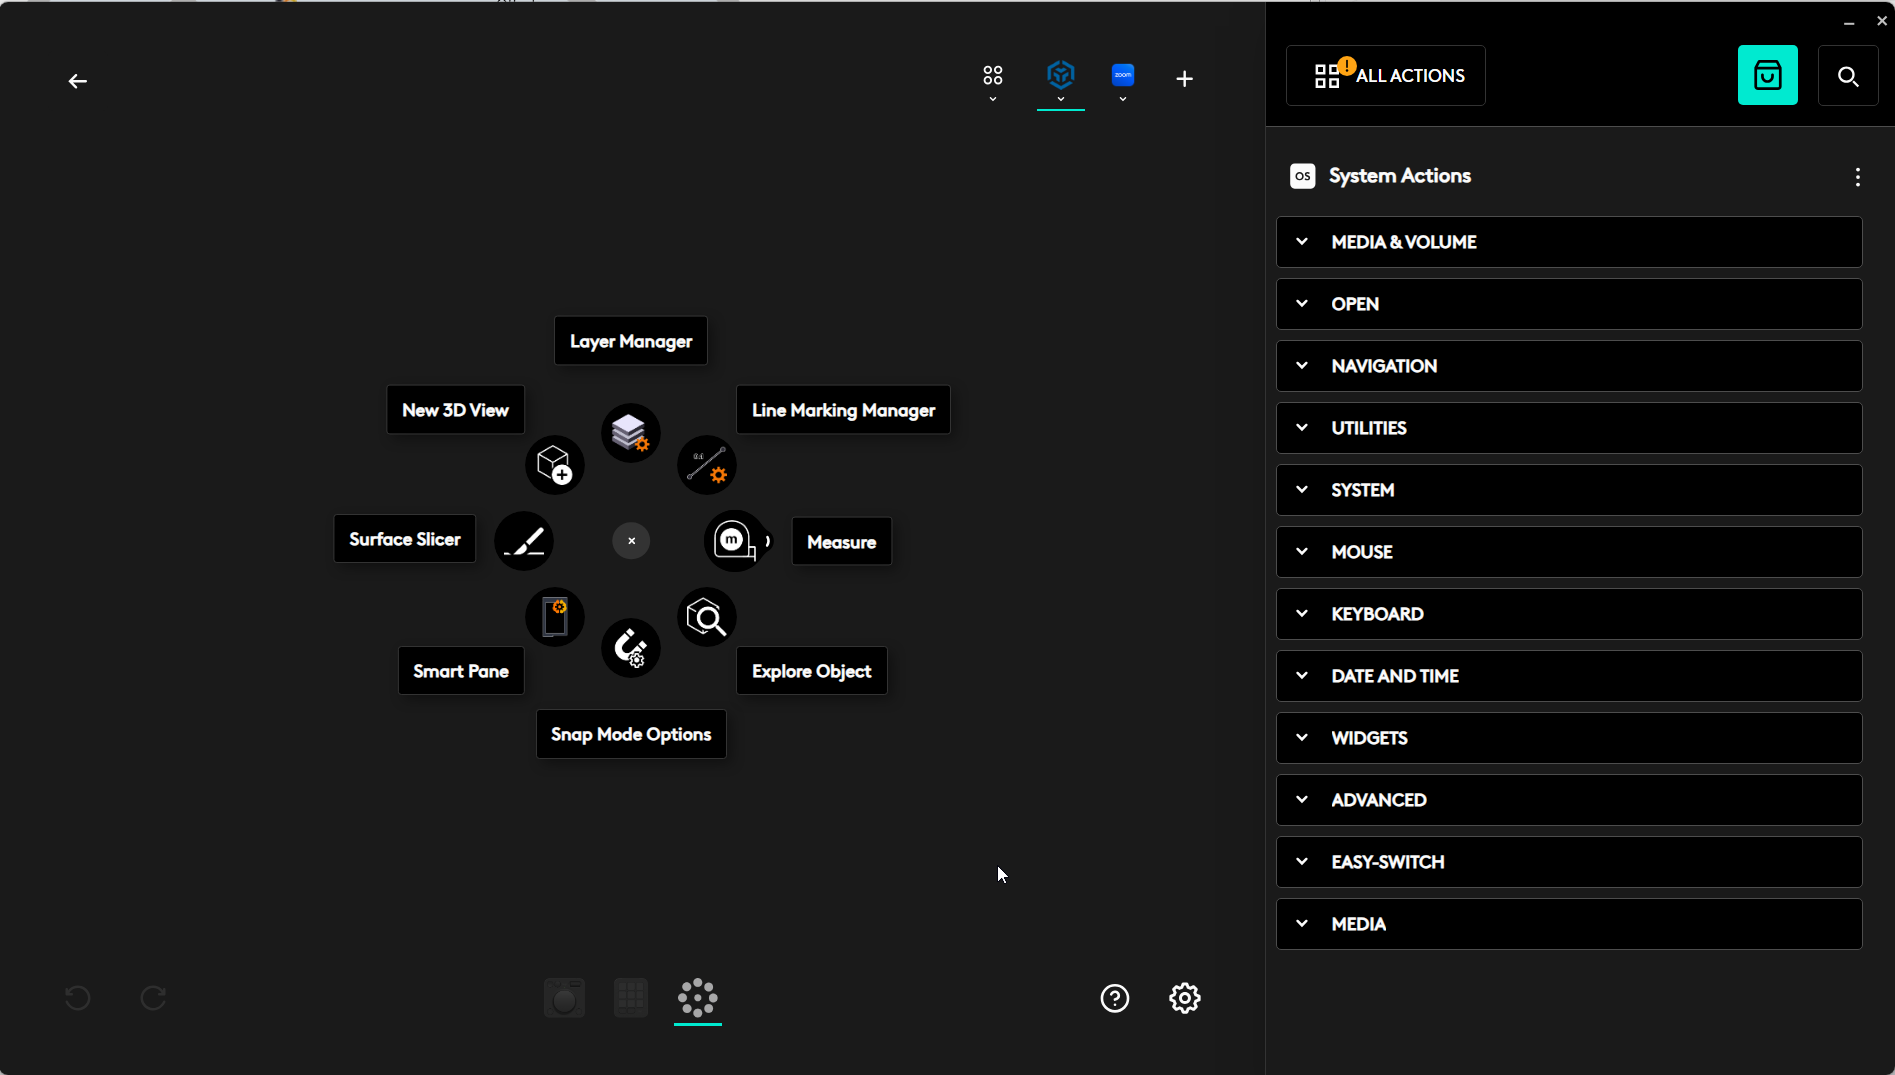
Before we start we want to bring in the Action ring Settings file that you downloaded above. Click on the Actions ring button ![]()

From the above screen, click the Customize Ring → button, to open the following screen.
From this screen click the Add Profile button ![]() to open the following screen
to open the following screen
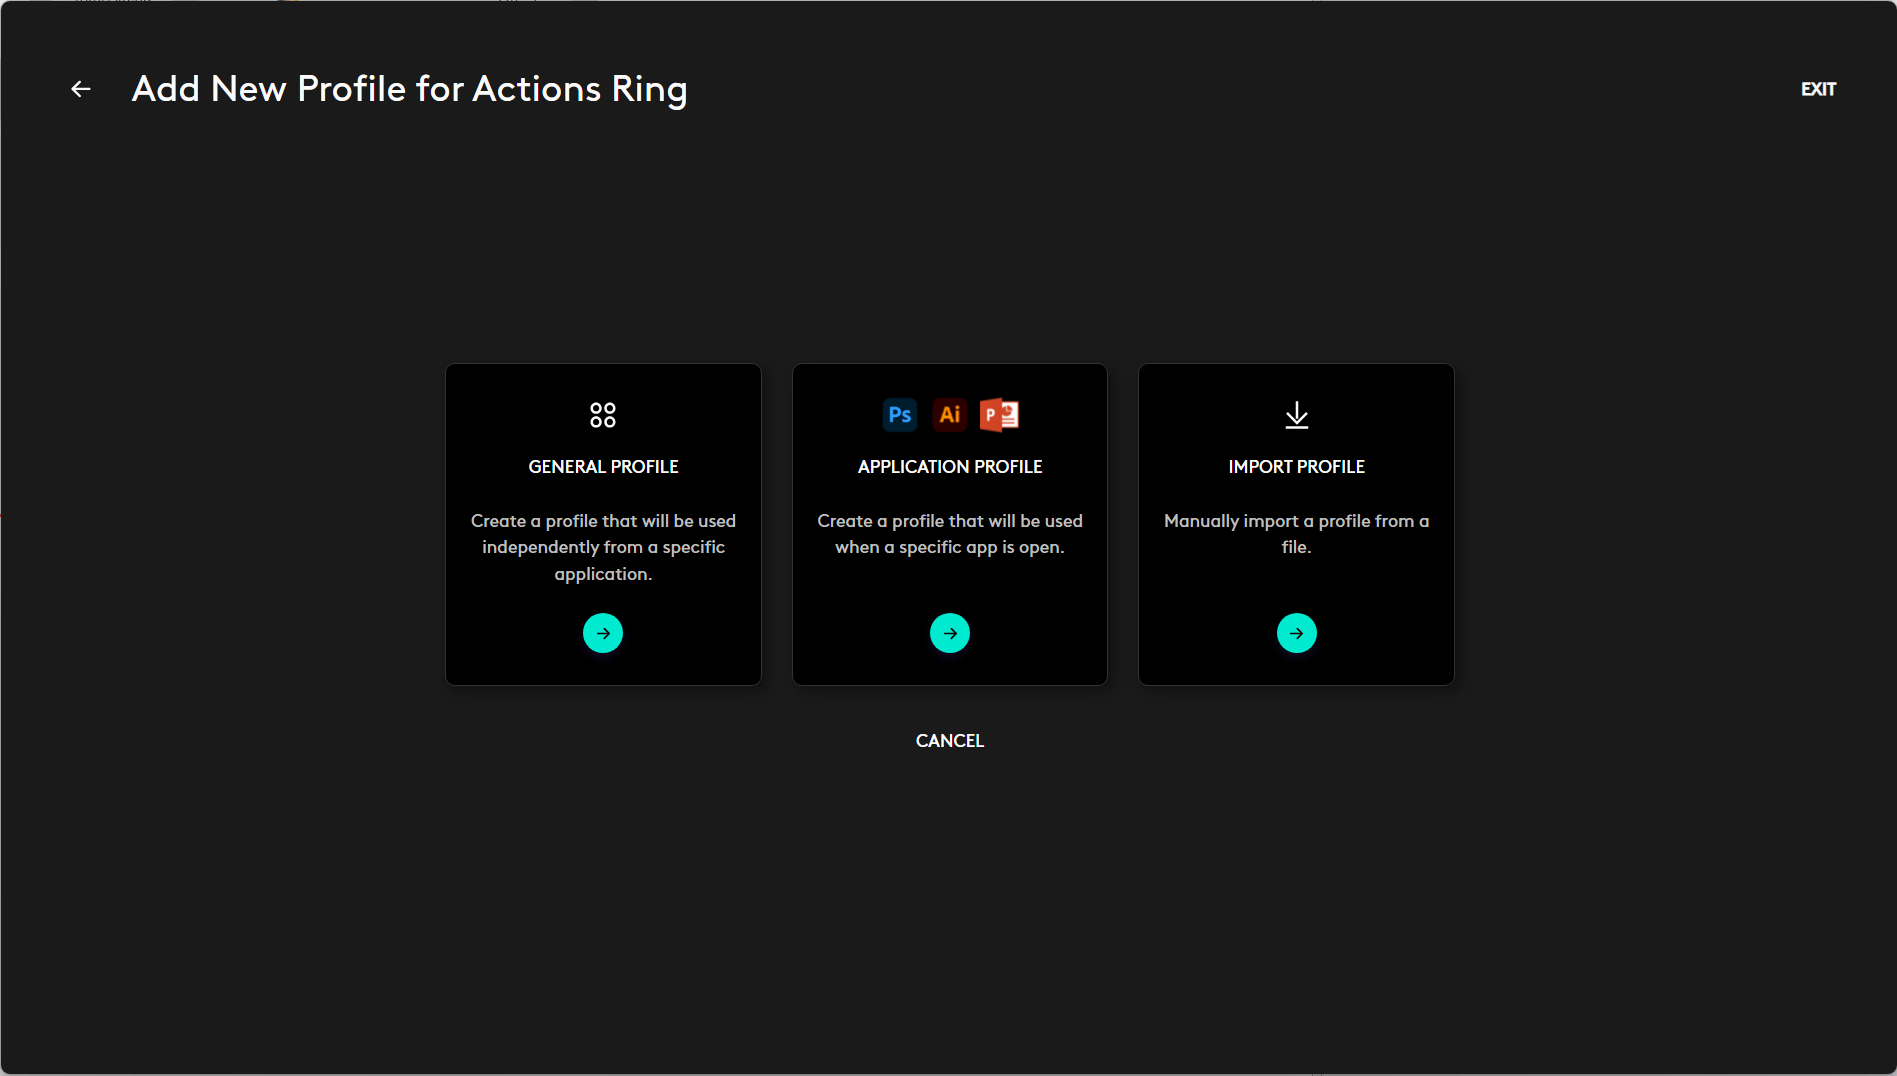
From this screen select Import Profile, and then browse to find the provided RPS Actions Ring Profile for Trimble Business Center. The file name is
Trimble Business Center (64-bit) Profile_Ring.lp5.
Once selected, you will be asked to Select application, this allows you to associate this profile with Trimble Business Center. Note that you can create a Mouse Configuration for all of your key applications, the Mouse switches its’ controls to match up with whichever application is currently the active window.
Select Trimble Business Center (64-bit) from the list of applications installed on your computer. If Trimble Business Center does not show up in the list, you may not have TBC installed correctly or fully, in which case you can use the Browse button. Browse for the TBC installation folder which should be
C:\Program Files\Trimble\Trimble Business Center
and then locate the application .exe file in the list of files in that location, it is called
TrimbleBusinessCenter.exe
and then click Confirm to select the TBC application.
On completion, this dialog will be shown
If you want to you can further program the Actions Ring or change the layout that we have defined as needed for your use case. We will come back to programming / modifying the Actions Ring Profile later.
If you do update the Action Ring Profile configuration, remember to save out your changes once you know that they are all working correctly. To save the configuration, Click on the Trimble Business Center Icon in the Logi Options sofware header bar and then click the three dots button on the right end of the pull down and select Export and then Browse to where you want to save the updated profile.
Click the Green Back Arrow Key twice to return to the home screen. You are now ready to configure the buttons on your mouse itself.
Configuring the Mouse General Settings
In this section you will configure how the buttons and scroll wheels work and react to user input, and also how the Haptic feedback system of the mouse will operate.
From the Home Screen, click on the picture of the MX4 Mouse
Point Scroll Press Settings
From the above screen, first select Point, Scroll, Press on the left side of the dialog.
You can click on any of the hite circles on the mouse image, to configure the settings for that control. Below are our recommendations for each Mouse Control
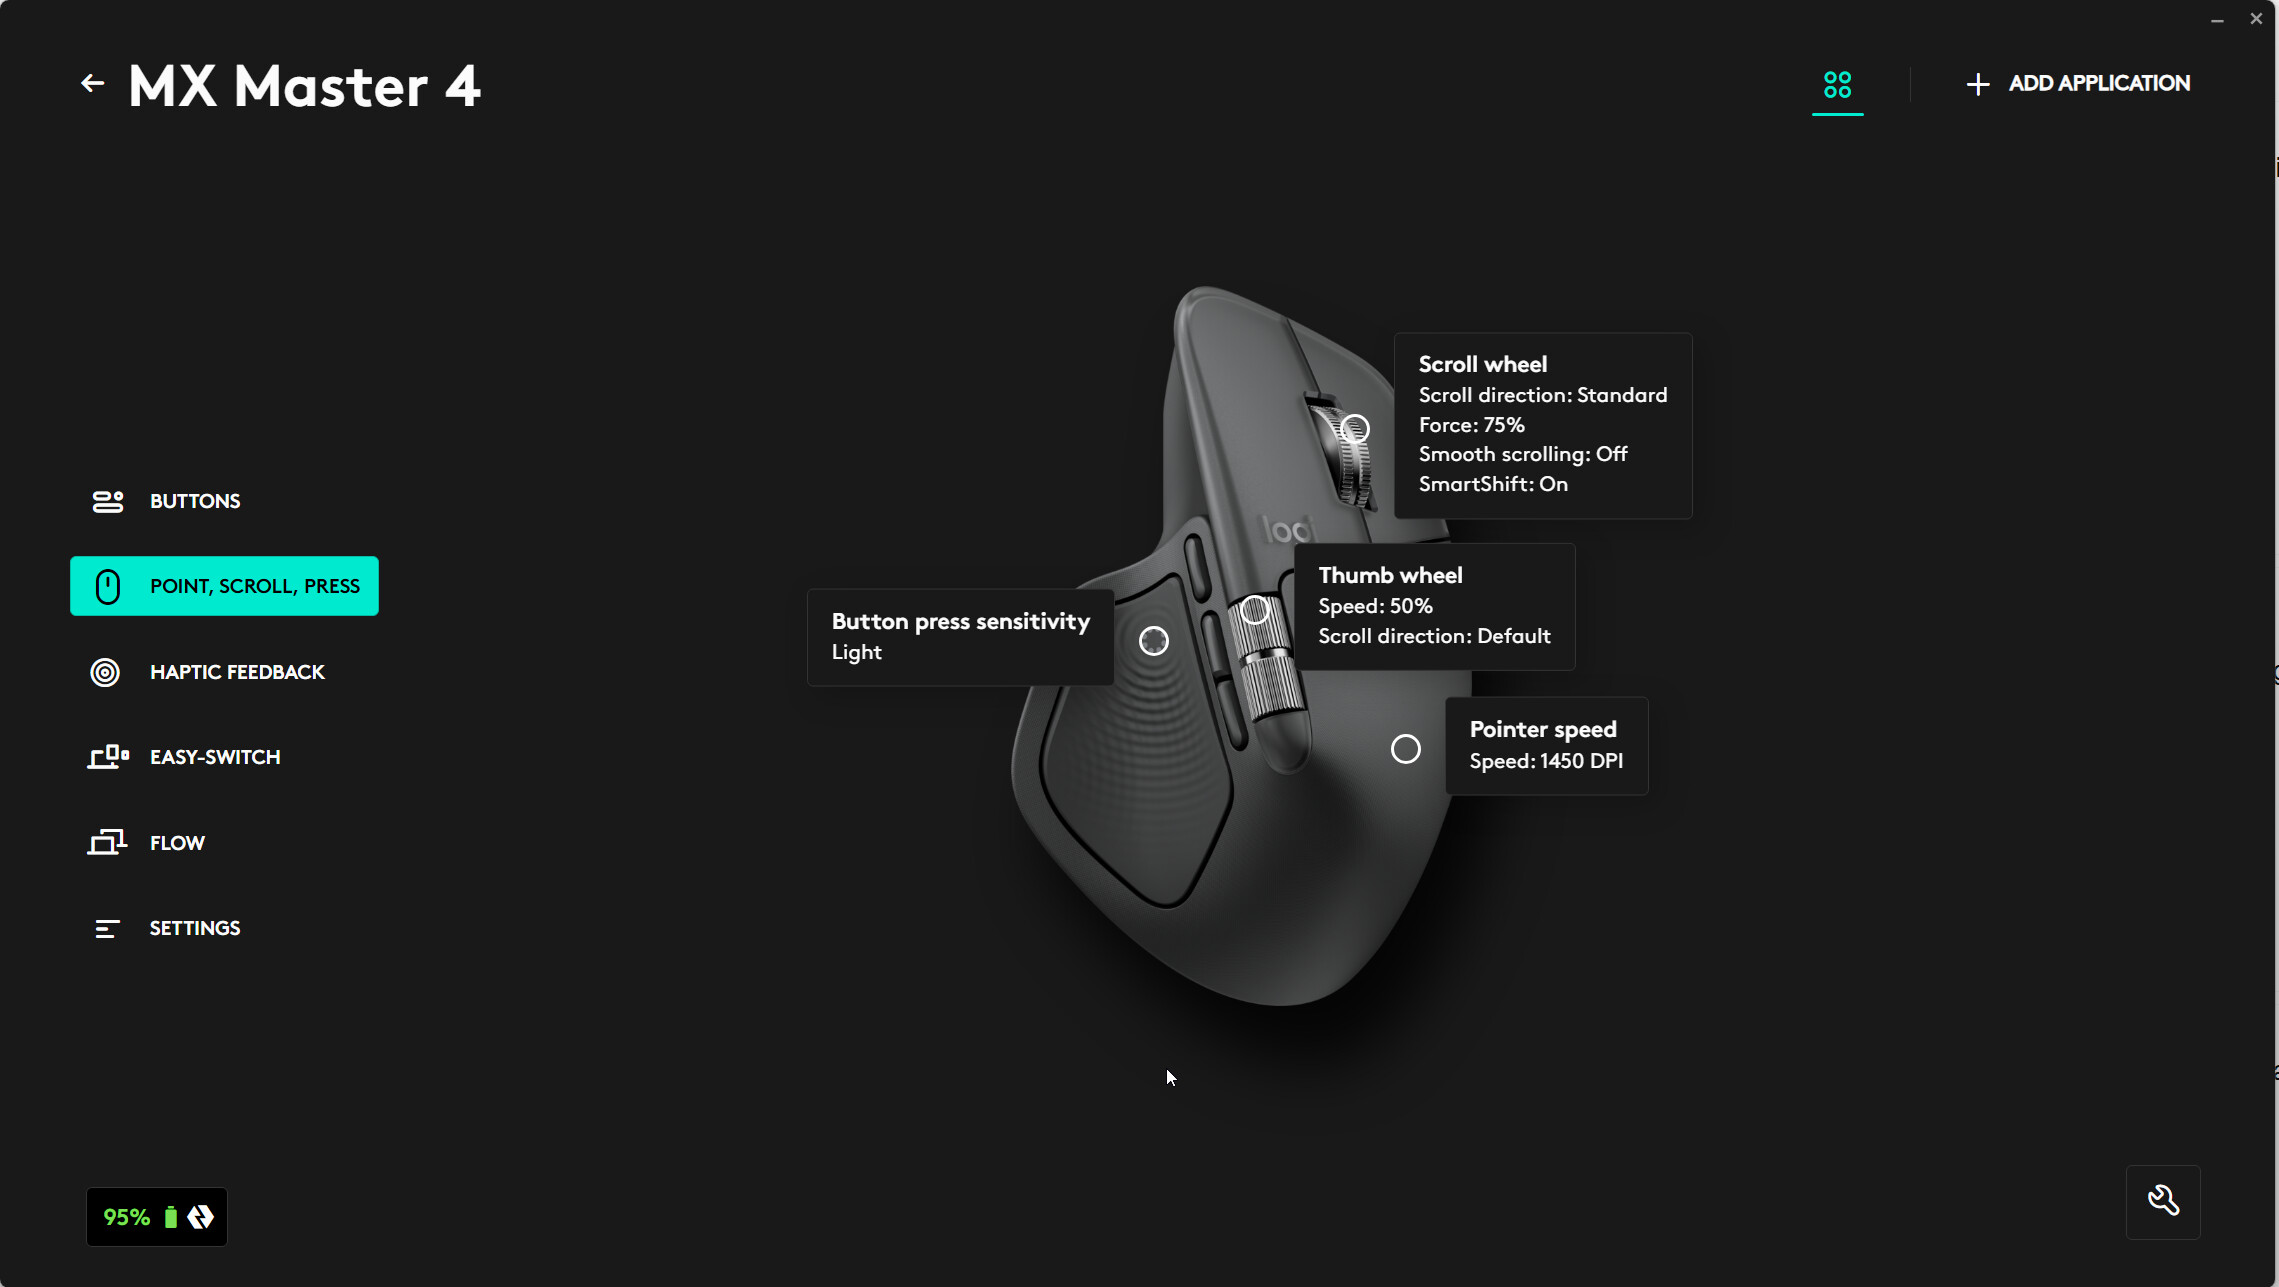
For the Thumb Squeeze Pad
Button press senstivity = Light
For the Thumb Wheel
Thumb wheel speed = 50%
Thumb whee direction = Default
For the Scroll Wheel
Scroll direction = Standard
Scrolling force = 75%
Smooth scrolling = Off
SmartShift = On
Sensitivity Value = 85%
Pointer Speed
Extend sensor range to 8K DPI = On
Pointer Speed = 1450 DPI
Haptic Feedback Settings
Click on the Haptic feedback button, the Haptic feedback is delivered through the thumb squeeze pad. Click the white circle on the thumb squeeze pad in the mouse image. Our recommended settings are as follows
Haptic Intensity = Subtle
Actions Ring = On
Smart Actions = No configuration suggestions
Gesture = On
Switch Screens = On
Battery Saving Mode = On
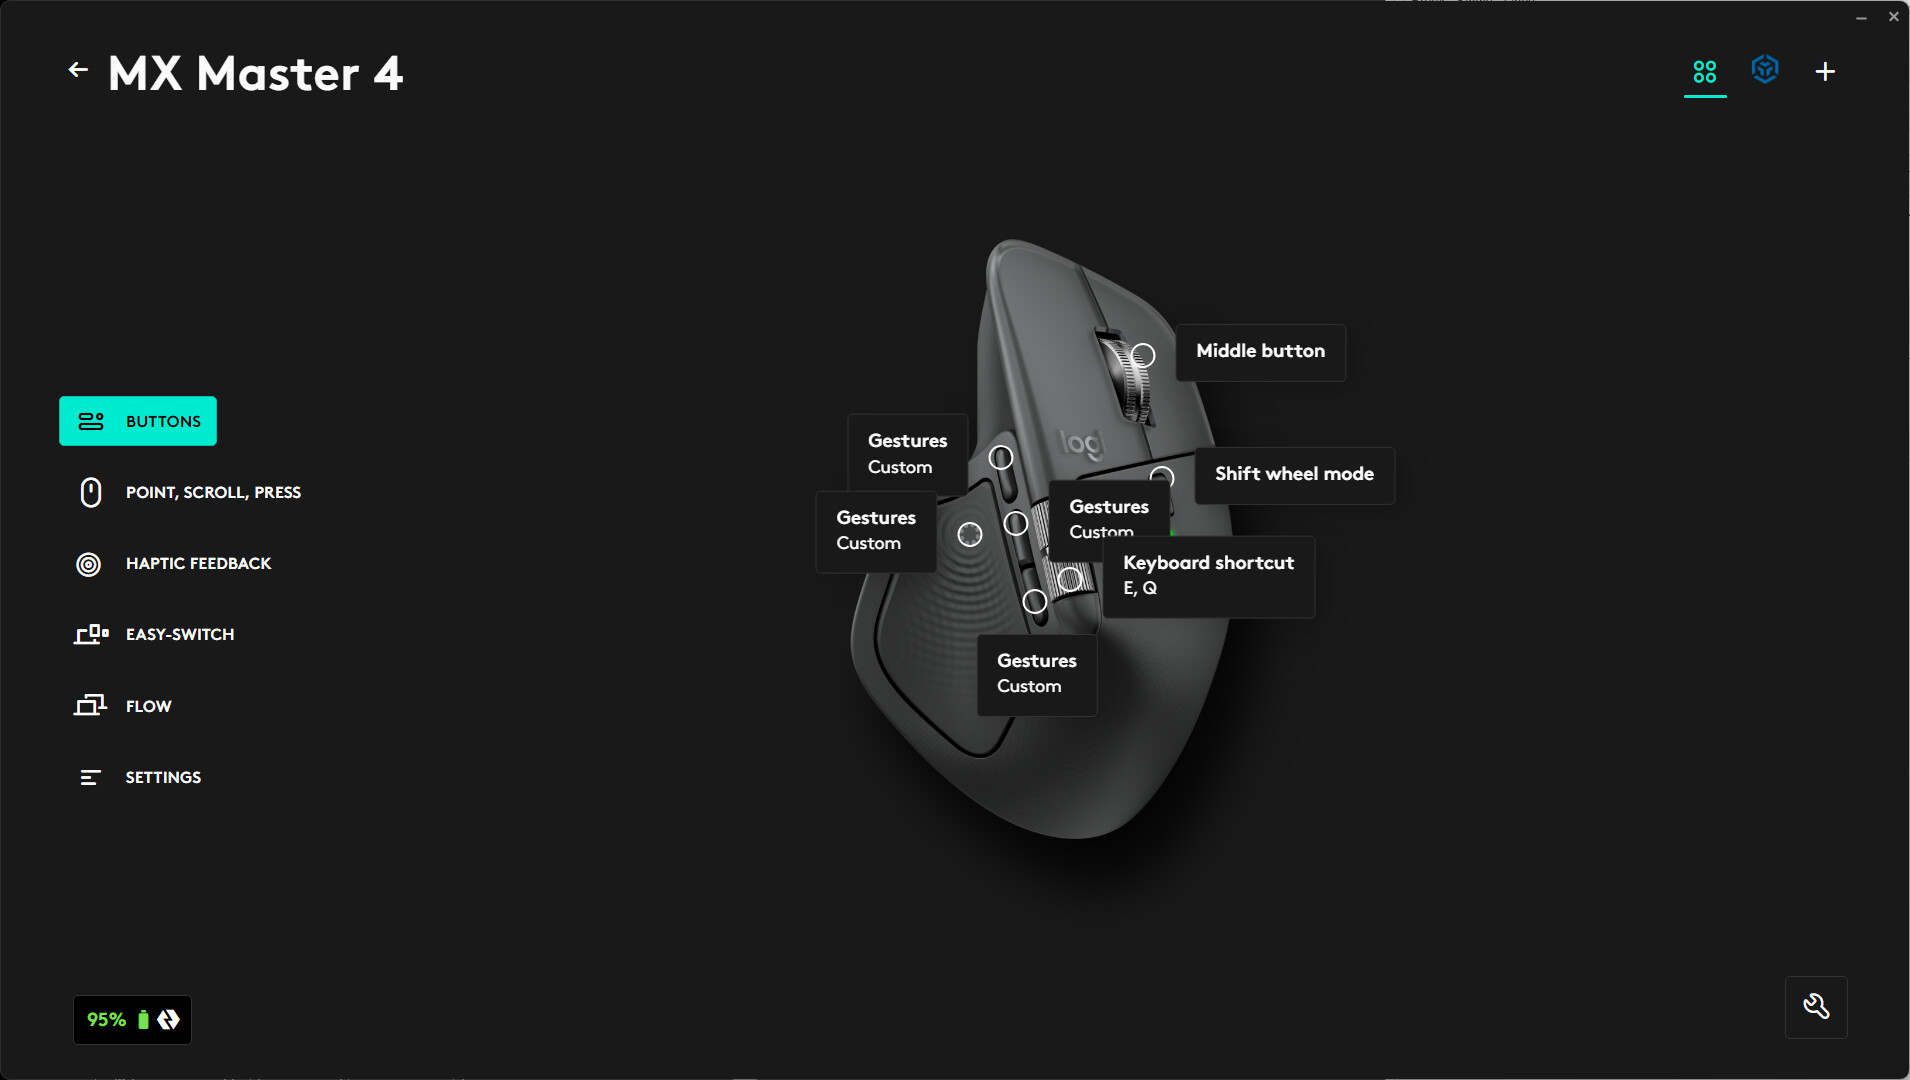
Mouse Button Configuration
In his section you will configure the click actions and gesture actions for each button and wheel of the mouse.
We do not recommend any special configuration of the Left Button Click, Right Button Click or Central Scroll Wheel functions, as these can interfere with normal software operations.
We do recommend at least Button Click configurations for each of the main mouse buttons, as well as for the up and down scroll of the thumb scroll wheel.
As you get more advanced, we are sure that you will also want to start using gestures also. Gestures are a combination of a click and hold of one of the buttons and a short forwards, backwards, left or right movement of the mouse. Each gesture can be programmed to execute a keyboard shortcut that can be set through RPS Shortcut manager in TBC to run a specific TBC command or RPS command hot key (active only when the command is running).
If you utilize our recommended setup, this matches with the RPS Defaults Settings in RPS Shortcut Manager that can be selectd in the command, accessed from the RPS Support Menu in TBC.
RPS Shortcuts configuration is installed when you install the RPS Command Library.
Our suggested configuration is as follows
Button Clicks
| Button Click Command | Command Shortcut | |
|---|---|---|
| Thumb Squeeze Button | RPS Navigator | CTRL - SHIFT - D |
| Button 1 (Front) | RPS Action Ring | |
| Button 2 (Middle) | RPS N = New Line / Loop | N |
| Button 3 (Back) | RPS M = Pop Up menu | SHIFT M |
| Thumb Scroll Wheel (Up) | Rotate Plan View Left | E |
| Thumb Scroll Wheel (Down) | Rotate Plan View Right | Q |
Button Gestures
| Gesture 1 | Gesture 2 | Gesture 3 | Gesture 4 | |
|---|---|---|---|---|
| Click and Forward) | Click and Backward | Click and Left | Click and Right | |
| Button 1 (Front) | ESC | SHIFT X | Z | C |
| Button 2 (Middle) | ESC | SHIFT X | Z | C |
| Button 3 (Back) | ESC | SHIFT X | Z | C |
| Thumb Scroll Wheel (Up) | N/A | N/A | N/A | N/A |
| Thumb Scroll Wheel (Down) | N/A | N/A | N/A | N/A |
In this example all of the programmable buttons are programmmed the same way. This way you can try the out and see what you like, and then determine the best use for the gestures. The above programming is for use in Smart Elevate e.g. Contour Mode, so that you can Decrease, Increase, Pop Up Elevation Edit, and use the ESC key to switch commands using RPS Smart Switch. In this way you can use the same gestures on any of the 4 buttons and get the same outcome. Remember that only ESC will function in all TBC and all RPS commands, the others are hot keys specific to Smart Elevate - Contour Mode.
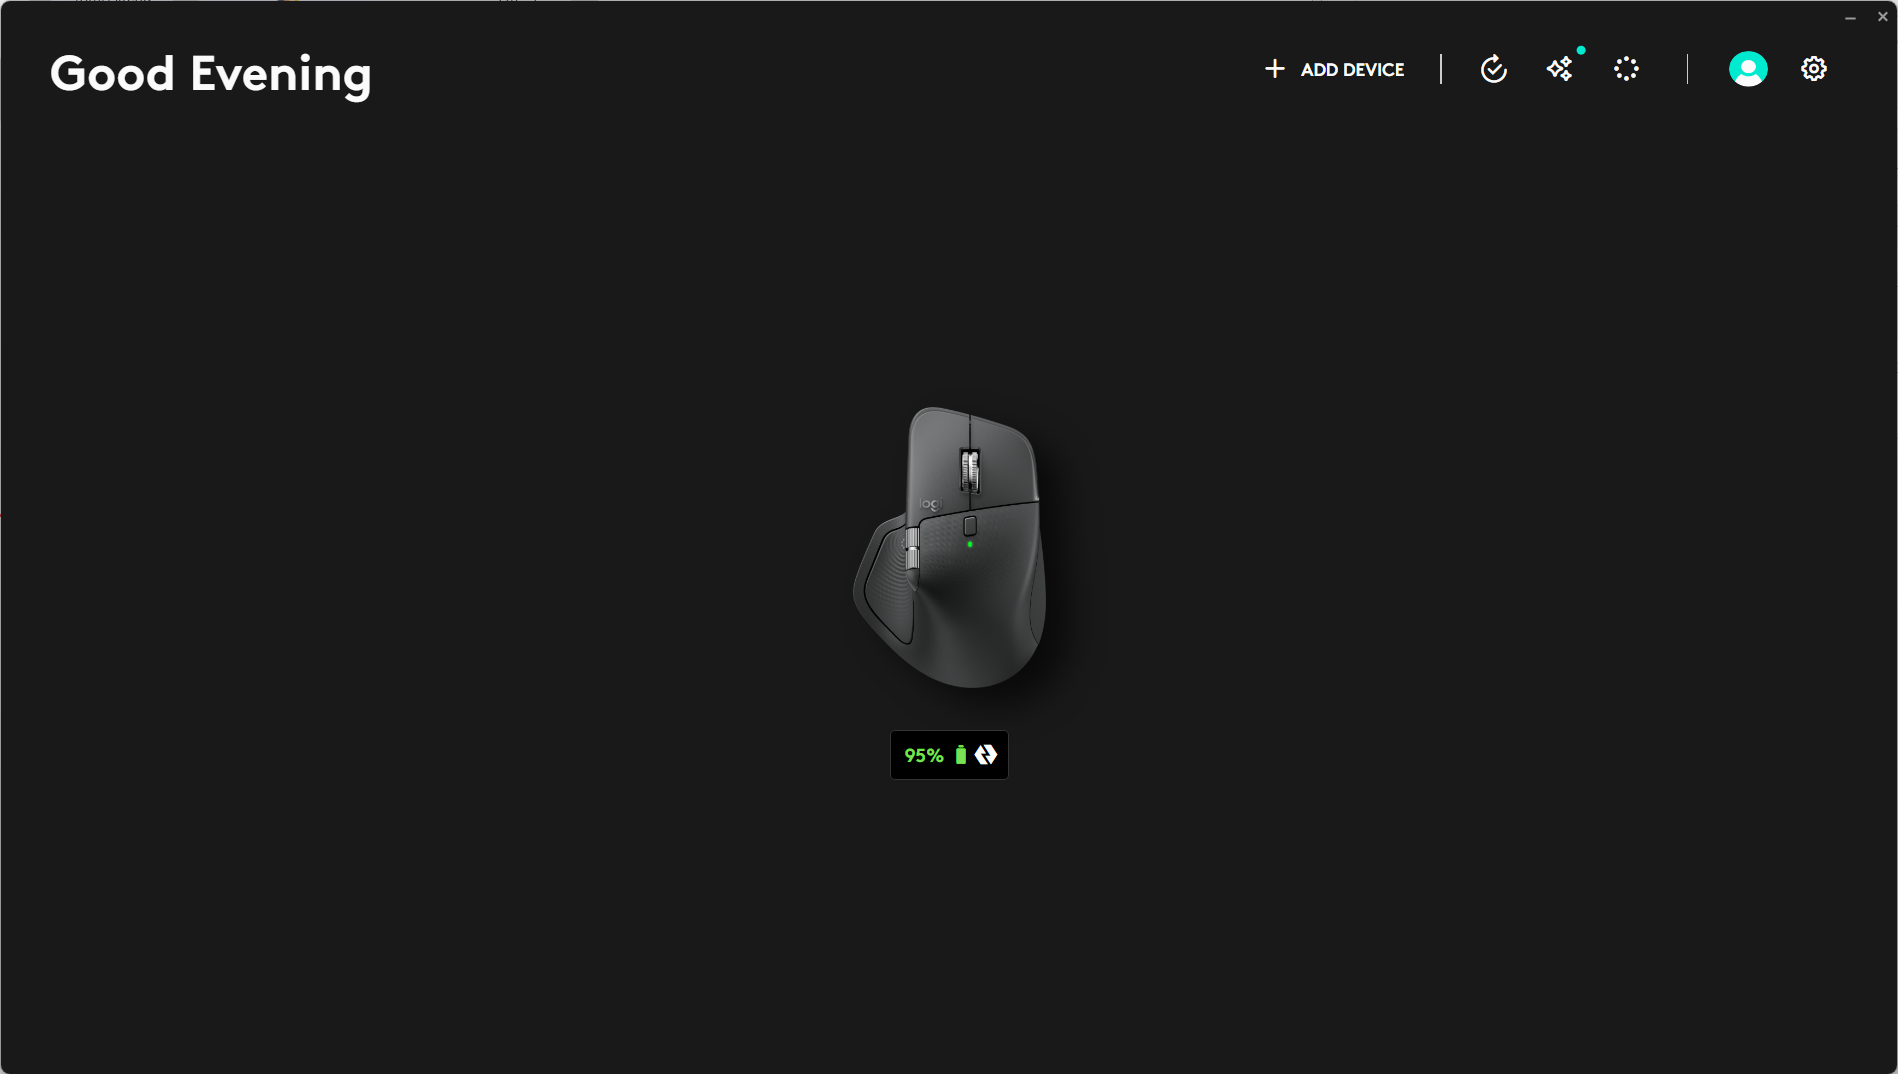
Click on the picture of the Mouse to move into the Mouse Configuration process. below the Mouse picture you can see the status of its internal battery.
Configuration of each button follows the same procedures, do each button in turn. Make sure that while configuring the Mouse that you are configuring the Trimble Business Center Profile not the General or a different application profile. It is easy to forget to check that and edit the wrong profile.
To configure the Button controls of the Mouse, start at this screen in the Logi Options software.
Let’s start out configuring the thumb squeeze button.
- Click the white circle on the mouse picture for the button that you want to configure.
- A menu appears on the right side of the Logi Options software. From the Menu, find the section called “OTHER ACTIONS” and select Gestures from the list of options. Under Gestures you will find a heading “Choose a preset or select Custom to create your own. Pull down te list and select Custom. Beneath Custom you will now see 5 options, the bottom option is what happens when you click the button, the other 4 options are what happens when you use the Gesture controls (click and hold plus a Left, a Right, a Move Up, or a Move Down of the mouse). Click in the Click field and the Logi Options will change to this view specific to this button configuration.
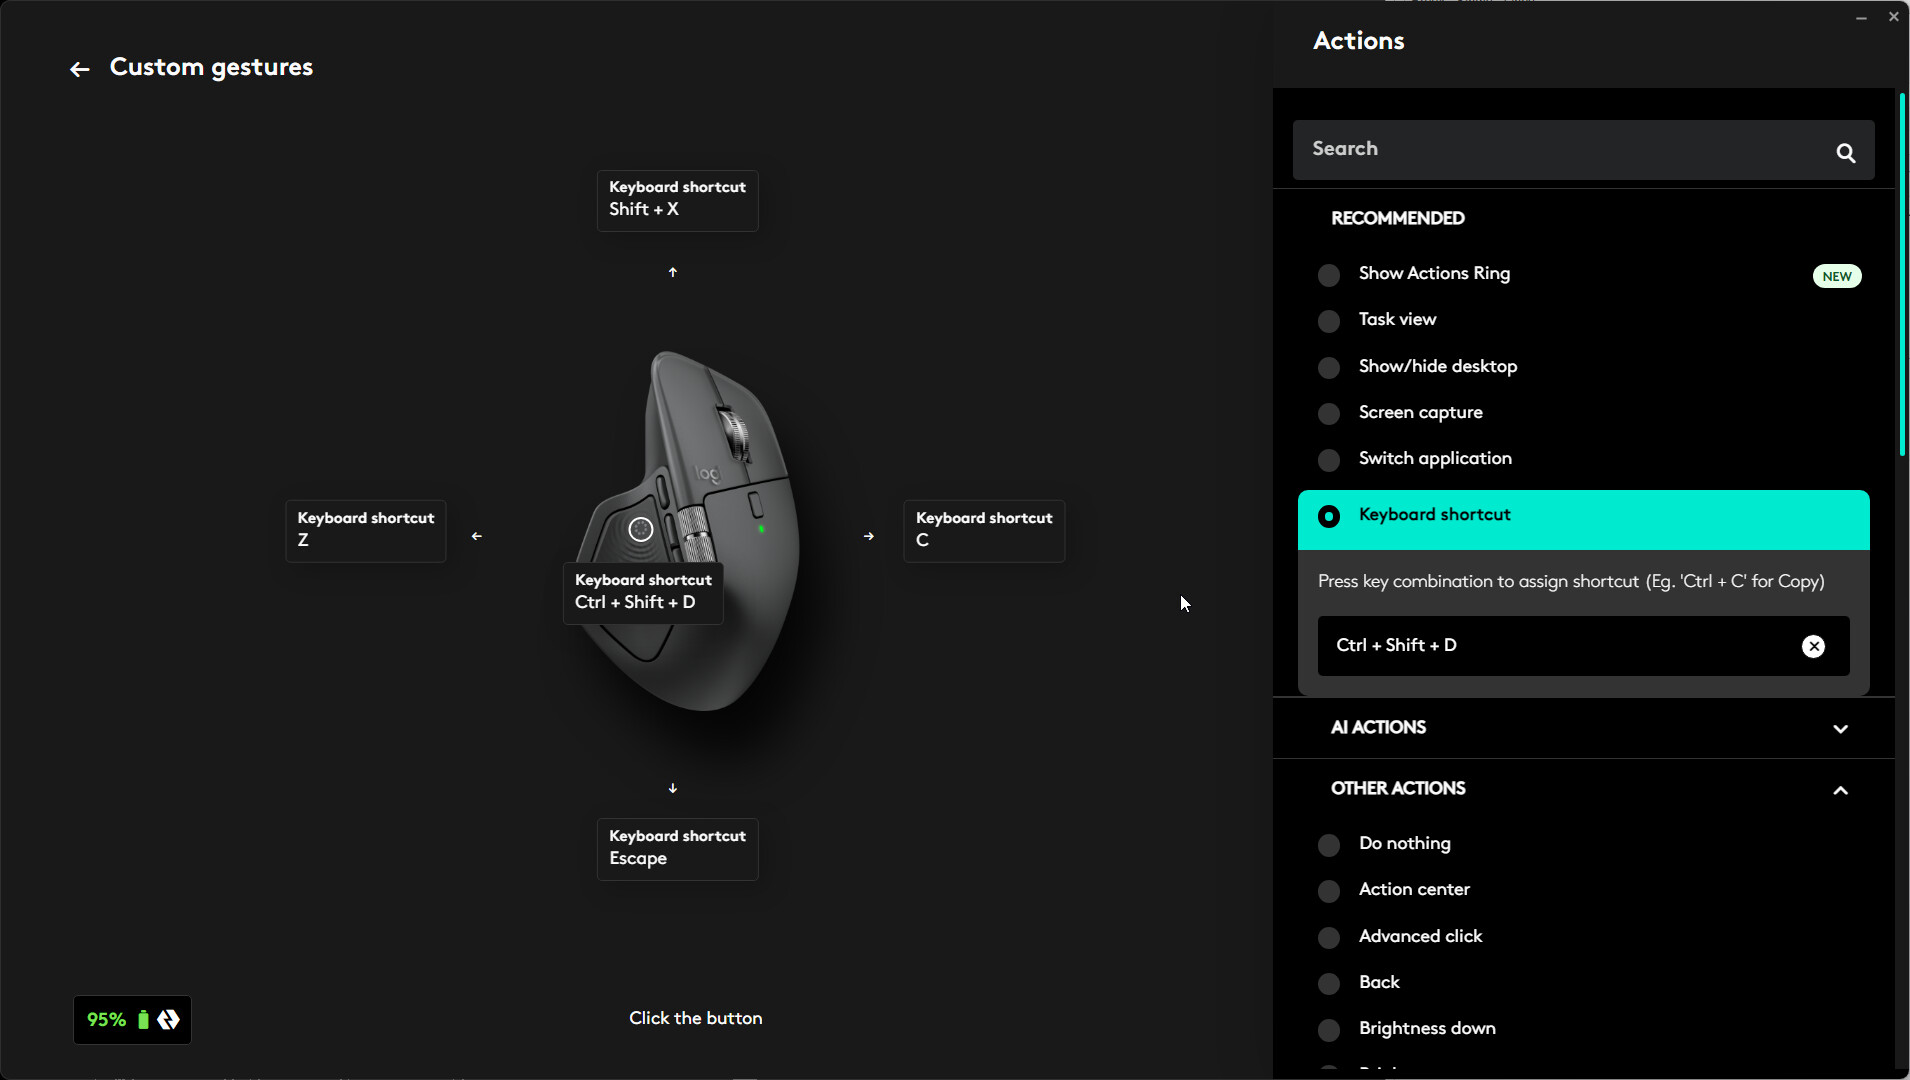
- You will now define the “Keyboard Shortcut” for each of the 5 options that you want to execute when you take that Click or Gesture Action. For the Click, click in the fild on the image that says Click. It will turn Green. On the right side, under RECOMMENDED, click Keyboard Shortcut. A field will then open and await the shortcut that you want to define. Use your keyboard to type CTRL + SHIFT + D the Shortcut we use for the RPS Navigate command (Radial Menu)., with the window still open, repeat for the 4 Gestures.
- For the gesture at the 12 o’clock position, use SHIFT X
- For the Gesture at the 6 o’clock position use ESC
- For the Gesure at 9 o’clock use Z
- For the Gesture at 3 o’clock use C
- You can now hit the back arrrow in Top Left of the dialog to complete the configuration.
Repeat these process steps exactly for each of the 3 programmable buttons using the same Gesture controls (you can always change them later on). for each of the buttons, the document will decribe how to program the Click function for each of the 3 buttons.
Button 1 - the Front Button
CLICK = Show Actions Ring (Available under Recommended)
- For the gesture at the 12 o’clock position, use SHIFT X
- For the Gesture at the 6 o’clock position use ESC
- For the Gesure at 9 o’clock use Z
- For the Gesture at 3 o’clock use C
Button 2 - the Middle Button
CLICK = Keyboard Shortcut “N” - this executes the New loop / New Line in RPS Commands)
- For the gesture at the 12 o’clock position, use SHIFT X
- For the Gesture at the 6 o’clock position use ESC
- For the Gesure at 9 o’clock use Z
- For the Gesture at 3 o’clock use C
Button 3 - the Rear Button
CLICK = Keyboard Shortcut “SHIFT + M” - this executes the Pop Up Menu in RPS Commands
- For the gesture at the 12 o’clock position, use SHIFT X
- For the Gesture at the 6 o’clock position use ESC
- For the Gesure at 9 o’clock use Z
- For the Gesture at 3 o’clock use C
Thumb Scroll Wheel
The thumb scroll wheel has two actions, Scroll Up and Scroll Down. Set both to Keyboard Shortcuts and set them as follows
Scroll Up = Keyboard Shortcut E (This rotates the plan view anti clockwise)
Scroll Down = Keyboard Shortcut Q (This rotates the plan view clockwise)
These commands will only function while running RPS Smart Suite commands.
Modifying or Adding To The Actions Ring Profile
Before starting on this process you will need to either create or locate icons for commands that you want to add to the Actions ring. You will also need to use RPS Shortcut Manager to create a new profile from the RPS Defaults, that has the new shortcuts that you want to use for the commands that you plan to add to the Actions Ring.
Lets carry out a worked example of a change that you may want to make.
- From the Logi Options home screen, click on the Actions Ring icon in the header bar
- Click CUSTOMIZE RING from the next dialog
- You can modify an existing profile or create a new profile. When you create a new profile by clicking the + button in the header bar, you can then select Application profile to create a profile that will be used when a specific app is open / the current Window on your PC. In this case the app will be Trimble Business Center. Click that button, and then look through the other applications for trimble Business Center. You can also type Trimble in the Search window to find the applucation more quickly. rom the next screen you can select START WITH A BLANK PROFILE and you will land at the configuration screen shown below.
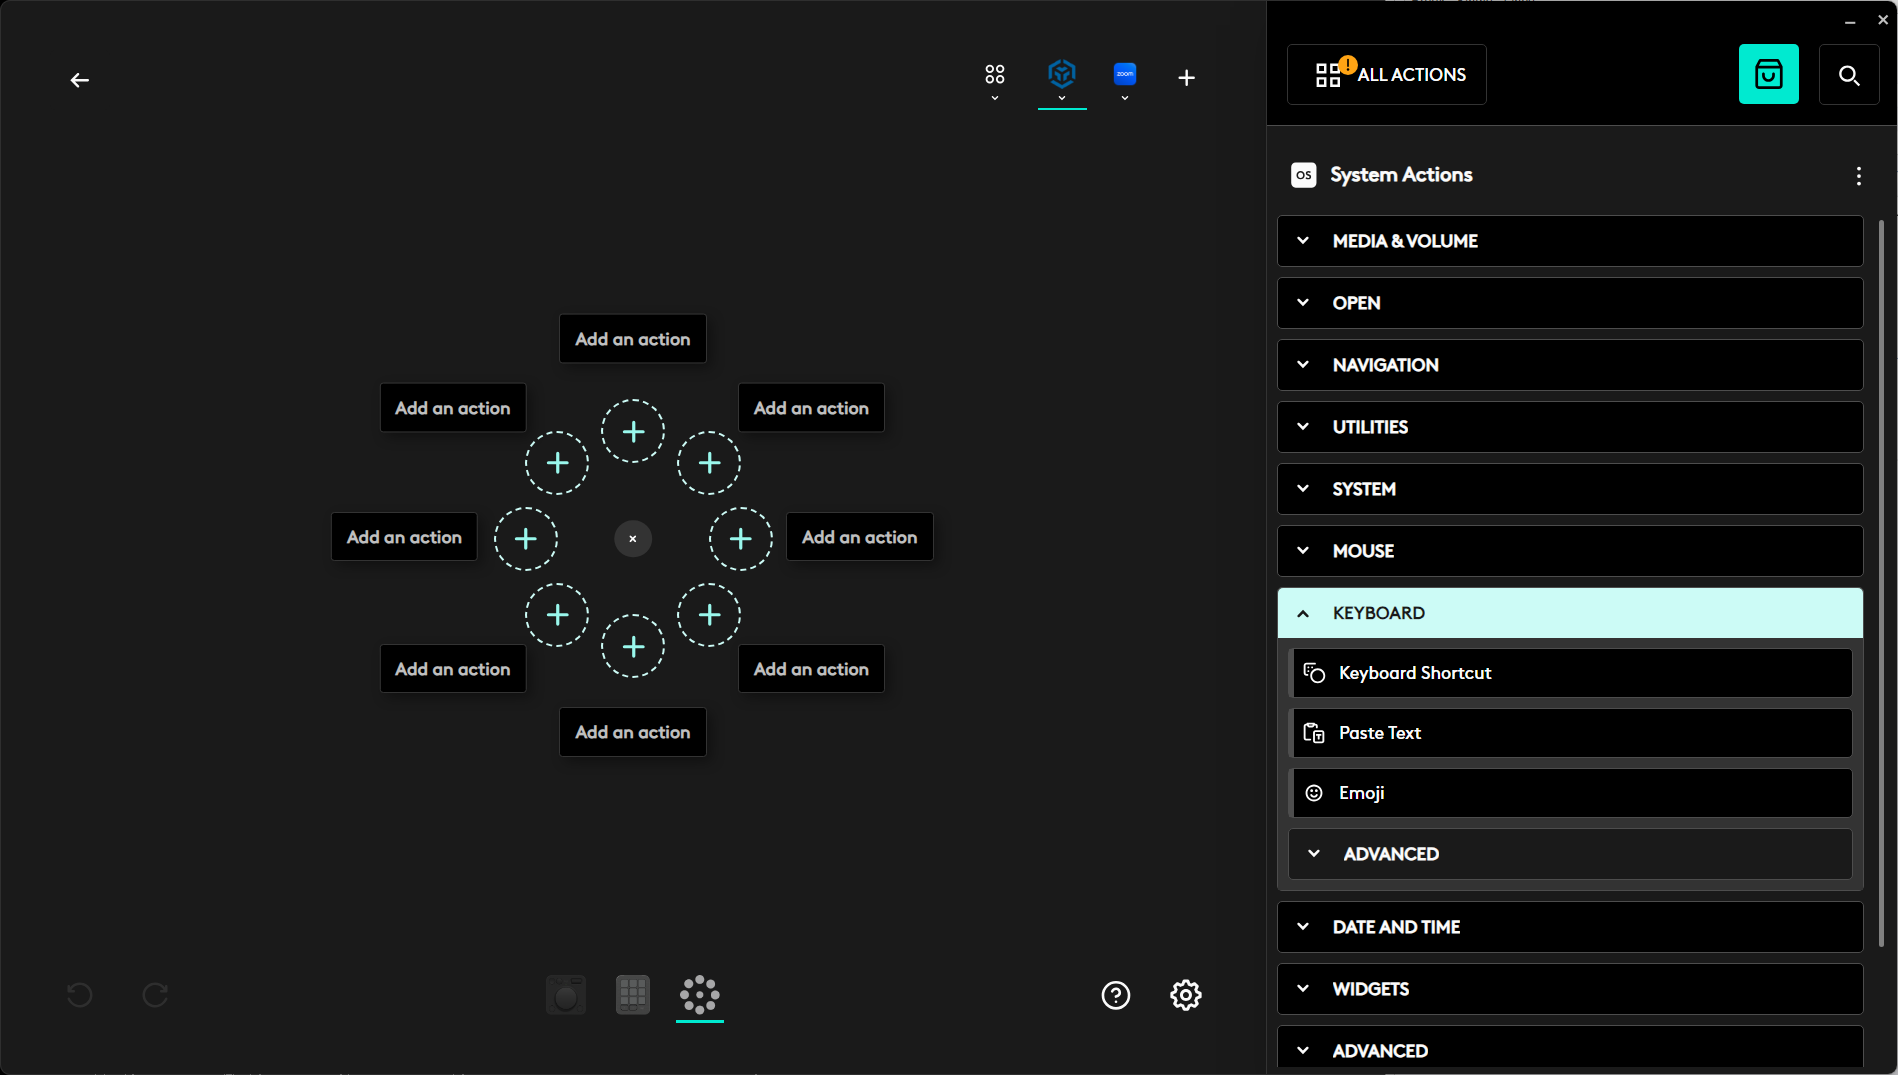
- If you are programming the Mouse for use with Trimble Business Center, you will normally be programming keyboard Shortcuts. These can be found in the right hand menu under System Actions and then under KEYBOARD and then select Keyboard Shortcuts.
- In the header bar, under the TBC icon, your current profile will be listed and it will be selected when TBC icn is enabled (Green Bar underneath the icon.
- The Action Ring has 8 available spots. Each Spot can be programmed as a command or as a Folder. To select whether you are creating an Action (Keyboard Shortcut) or a Folder (a group of commands under one button), click on the 3 dots button in the top right or left corner of the boxes that says Add an action for the button that you wish to program. Select from the three options
- Paste Action - You can copy an action from one button to another as a start point for the new button
- Create a Folder - A folder can have multiple buttons nested underneath the main button. Hover over the main button to expand the folder out to reveal the additional buttns in the folder.
- Recommended Actions - from here you would typically select Keyboard and then Keyboard Shortcut to program a button.
- Lets create a Layers Group and then add the new Layer, Relayer, Layer Manager and Isolate Layers commands into the group
- Select Create a Folder, In the top left of the dialog that is presented change the Foldr Name to Layers.
- Now click Add an Action and select Keyboard Shortcut on the right side options.
- Name the Action New Layer and set the Keyboard Shortcut to CTRL + N. Click the pencil icon next to the icon, to opn the Icon selector / editor for the button. The icons can be a max size of 150kb each, and need to be designed to fit the circular shape of the action buttons. Click Save. I have foyund this to be a bit finnicky at times, and it may or may not take the first few attempts.
- Keep adding actions for each of the four commands using the shortcuts as follows
- Layer Manager = CTRL + SHIFT + U
- Relayer = CTRL + R
- Isolate Layers = CTRL + 1
On completion o this process, if you then make sure that you select this profile by clicking on the TBC Icon in the Action ring configuration Screen, and make the new Profile Active, when you click Button 1 while TBC is the active window, you should get an Action Ring that looks as follows
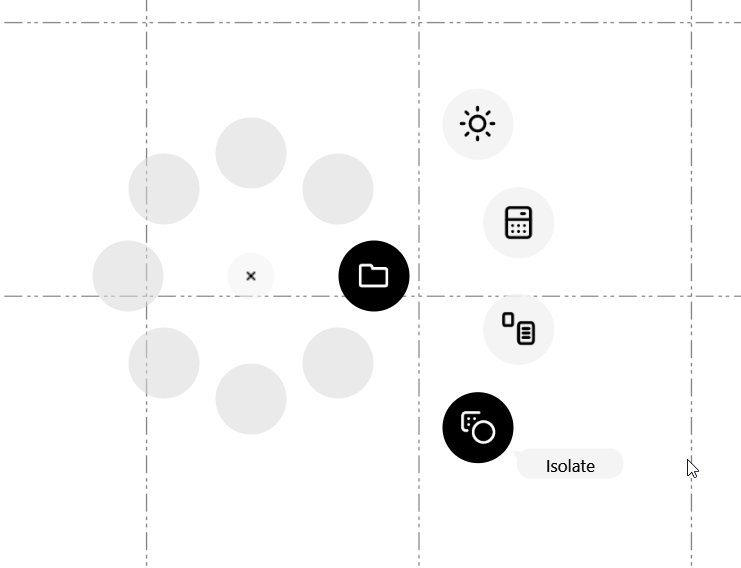
I selected random icons or each of the command buttons that I created here from the sandard button icons that are provided by Logitech. In the Actionb Ring we have provided you with, we have also created a set of custom icons to go with our configuration, but that is proprietary RPS product and not available for reuse.
Reset the Action Ring Profile to the default RPS Action Ring that we provided to you, and you will be all set to utilize your MX4 Master Mouse.
Backing Up Your Uer Defined Settings
From the Logi Options Home Screen, click on the picture of the Mouse.
- Select Settings from the left side menu
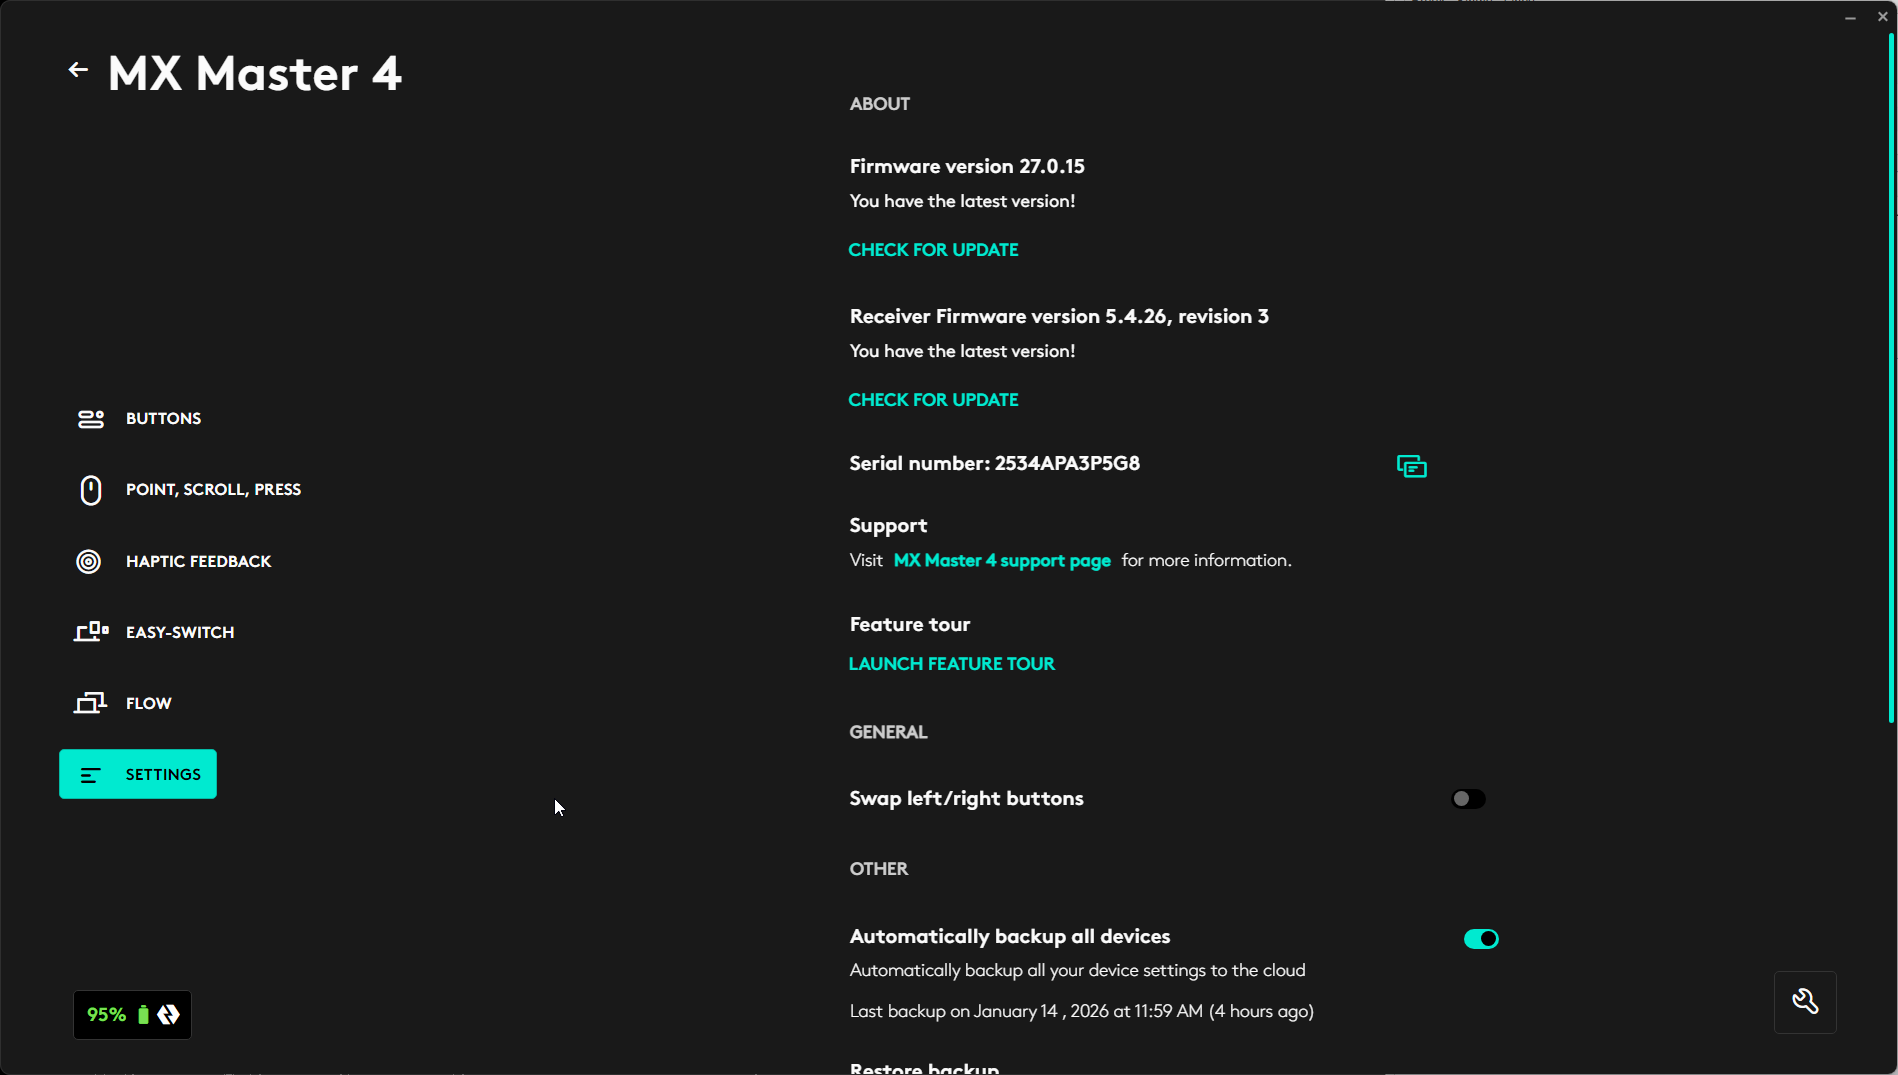
- From the settings options select Automatically backup all devices and set that to ON. As you make changes to your configurations, it will automatically update the backup for you.
- If you need to ever restore your settings from your account, you can select Restore backup from this same settings menu and follow the instructions to reinstall your Profile on the computer you are working on. Provided that you are logged in, you can restore your settings on as many computers as needed, but you have to be logged in as yourself.
- At this time we are unaware of any way that you can share your complete settings with other users. You can share the Action Ring profile, but not the other elements of the Mouse Profile.
General Notes
When working with TBC you now have multiple ways of running a command
- TBC Standard Menus
- RPS Standard Menus
- RPS Custom Menus
- RPS Navigate - Puck / Radial Menu
- Command Shortcuts via the Keypad
- Header Bar Command Icons in especially RPS Commands
- Smart Switch - Accessing Commands that are already running
- Elgato Streamdeck with Rock Deck configuration
- Logitech Mouse Controls
- Logitech MX Creator Console
In addition while you are inside an RPS Smart Suite command you also have in command shortcuts that will access different functions of the command. Those shortcuts can also be accessd from your
- Keyboard
- Logitech Mouse Buttons and Gestures
- Elgato Streamdeck with Rock Deck configuration
- Logitech MX Creator Console
While it is unlikely that you will use all of the above, picking your tools to suit the way you work, and optimizing their configuration to accelerate your work processes is an important factor in gaining productivity and efficiency using TBC. We recommend that you focus your system configuration to leverage the tools that you decide to use, and minimize menus and menu items to just those that you have not configured elsewhere that maybe you use less often.
It takes time to learn new tricks and lose old habits, while those old methods are still available to you, you will keep going back to them, not because they are better, just because your mind and muscles know they are there and where to fuind them.