Subdividing Large LAS Files
Sometimes you are sent a LAS Point cloud file that is huge, and maybe you have insufficient RAM or GPU Memory to process the file, so on import you get so far and then the import stops and you lose the latter part of the data. So how di you get at the back half of the data file, and how do you make the point cloud more usable.
Also on import you are asked if the point cloud is Georeferenced or Non Georeferenced, whether it is Grid or Ground Scaled, and whether it is defined in the Project Coordinate System or some other Coordinate System. You may not know even what units the file is defined in, and it is extremely hard to then import the data and get it to match up with your existing project data. If the file is large, that just compounds the problem, because now you are also faced with long import times only to find out that you got it wrong and you have to start over.
With the RPS Cloud Services command - Process LAS files, this is no longer an issue.
The command allows you to read the LAS file and turn it into multiple sub files of a user defined grid cell size, each file is named and mapped to a grid square that is drawn in the plan view, and labeled with the file name that correlates to the grid square. This means you just have to process the file once, create the sub files (which are not imported into TBC), and then you can import one of the sub files to check to see if you have the units, coordinate system, and Grid or Ground setting correct before you import the remainder of the files to complete the data set. If you have a file that is too large for your available processing power, you can import part of the project, use Point Cloud Processor or other TBC tools on the data to reduce it and then output the reduced point cloud(s) file to an external .las file (using the RPS LAS Export command) that can be later combined with other similar files for complete site processing.
In this way you can handle any size project, in pieces as required, and shortcut the time taken to review data to determine the parameters that you are working with, allowing you to get moving faster, and freeing up valuable computing time.
Video Demonstration
The following video shows you how to use the Process LAS file command of Cloud Services.
Command Details
The Process LAS file command can be found in the Cloud Services - Commands Tab, under the Data processing Group, as Process “Process LAS File”. The command dialog looks as follows.
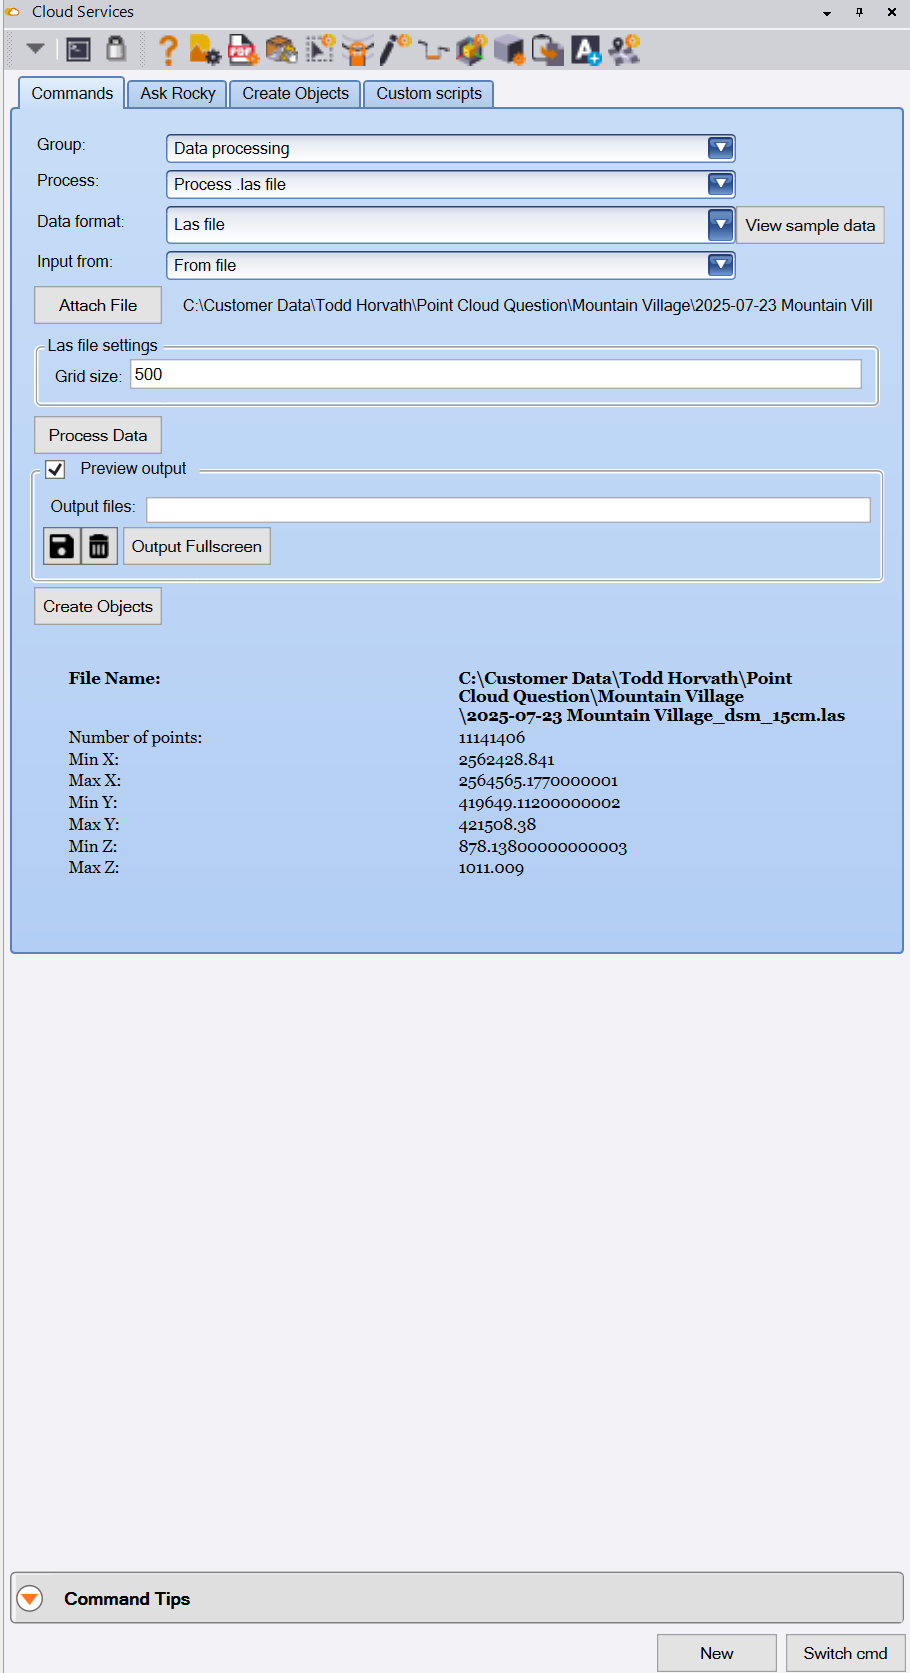
Group
Select the Group called Data processing to find the Process .las File command.
Process
Select the option called Process .las file to use this command.
Data Format
Currently there is only one format of file that you can select, that being the LAS file format. No need to change this setting from LAS File.
Input From
There is currently only one option for the Input from selector, no need to change this from the From File option shown.
Attach File Button
Click the Attach File button to open the Windows File Explorer, browse to the LAS file location, and select the LAS file that you wish to process.
LAS File Settings - Grid Size
Enter the Grid Size for each of the cells that will hold the sub LAS files created by the process.
Process Data Button
Click the process data button to process the selected LAS file and create the sub grid LAS files from it. the original file is left untouched by the process.
Output Files List
The output files list shows the list of the sub LAS files created by the process. The files are all created in the current projects project folder. the names of the files are correlated to the grid cells drawn in the plan view of the project
Plan View Graphical objects - these cells and labels are drawn on the 00 - Grid Cells layer in color Red.

Output files list that correlates to the plan view graphics
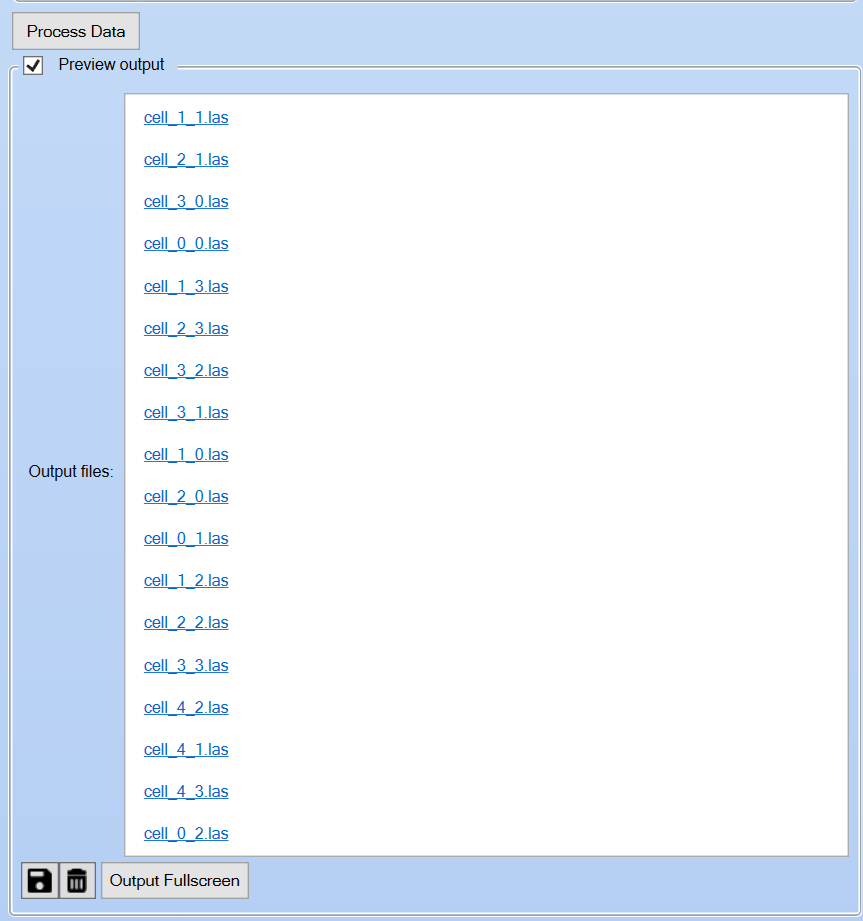
When you click on one of the files in the files list, Windows File Explorer will open at the current project folder location and display the files to you. Select one or more of the files and drag and drop them into TBC to import the files into the project. You will find that each file fills or partially fills the appropriate grid cell in the plan view after import (see image above as an example).
Save Button
Not used in this command
Delete Button
Clears the Output file(s) list, but does not delete the files from the project folder.
Output Full Screen Button
This function is not used in this command.
Create Objects
This provides a one click switch the Create Objects tab of the Cloud Services command. In some Cloud Services command you may process data with a tool in the Commands tab, and then create TBC objects from the process results in the Create Objects tab of the command.
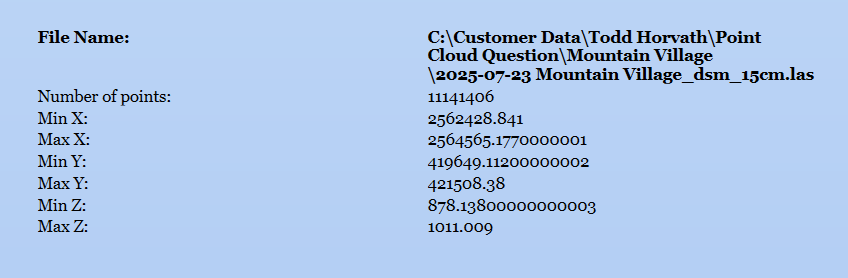
LAS File Information
The LAS file information area displays the LAS file name and path as well as the Min and Max X, Y, Z coordinates in the file and the number of points in the file. These values help you to gauge the cell size that you should use to subset the file.
Command Tips
The Command Tips area of the dialog provides access to the Help Documentation (this or the command master document), it also provides other useful Tips or shortcut keys that may be available to you while running the command.
Header Bar Commands
In the Header Bar of the Cloud Services Command, you will find a number of icons that provide quick access to other commands that may be useful while running the Cloud Services command. header Bar commands include
- List of currently running commands
- Access to the Command Pane
- Unlock Command - this is a new feature that allows you to remove the focus from the current command, so that you can select and query objects in the graphics pane. When you are done with your queries, or accessing Right Click menu functions, you can return to the lock / unlock button, click it to re lock the command to return focus to the command dialog.
- Command Help - This document or the master document for Cloud Services.
- RPS Settings
- PDF Manager
- CAD Cleanup
- Smart Select
- Smart Draw
- Smart Edit
- Smart Elevate
- Smart Model
- Volumes Manager
- RPS Paste
- Create Text
- Smart Map
New
Click the New button to initiate a new process with a new LAS source file. This clears the prior process, and restarts the procedure to handle a LAS file.
Switch Cmd
The Switch Cmd is a feature of all RPS Smart Suite commands. It allows you to see a list of currently running Smart Suite commands, allowing you to select and switch to a different command that s already running. The list of commands also provides the ability to close the current command or close all currently running commands.
The Switch Cmd function can also be accessed by pressing the ESC key on your keyboard. This pulls up the Switch Cmd list of currently running commands, right on your mouse cursor. Simply select the command you want to switch to, and move into a different command.
If you press ESC ESC on your keyboard, this will typically close a Smart Suite command, however some commands like Smart Edit and Smart Elevate utilize the ESC key to switch between the Edit Mode and Select Node Mode of the commands. In this case ESC does not work to call up the Switch Cmd function on your mouse cursor.
Feedback and Enhancement Requests
If you wish to provide feedback or request enhancements to the Process LAS files command, please click Reply below to put in your request or feedback.